The focus of this chapter is one of the most important of all uses of technical writing— instructions. Instructions are step-by-step explanations of how to do something: how to build, operate, repair, or maintain things. For a quick overview of writing instructions, check out this link: “Instructions: How to Write Guides for Busy, Grouchy People” (https://jerz.setonhill.edu/writing/technical-writing/instructions-how-to-write-for-busy-grouchy-people/).
The chapter begins with a brief overview of the importance of knowing how to write instructions, followed by some basic guidelines. The chapter goes into some depth in regards to analyzing the rhetorical situation for writing instructions. The rhetorical situation includes the purpose, audience and context for any particular set of instructions. Next, we cover how to plan and organize the writing process followed by information about the content that is typically included in instructions. The chapter ends with some nitty-gritty tips on writing the instructions.
One of the most common and important uses of technical writing is instructions—step-by-step explanations of how to do things: assemble, operate, repair, or do routine maintenance on something. Many people associate instructions with appliances, computer accessories, products that require assembly (e.g., furniture) and DIY projects. Because we do not find ourselves using them regularly or we come to expect them only in certain contexts, it is easy to forget how important they are. The quality of a well-designed instruction manual may go unnoticed. Yet, when we encounter frustration with putting together a bookshelf or toy, or with trying to figure out how to change or activate a particular appliance setting, the significance of well-written and designed instructions becomes clear.
Although it may seem intuitive and simple to write instructions, it is not always that easy. What follows in this chapter may not be a fool-proof guide to writing instructions, but it will show you what professionals consider the best techniques.
Ultimately, good instruction writing requires:
· Clear, simple writing that utilizes strong, descriptive verbs to reveal the process’s discrete actions
· A thorough understanding of the procedure in all its technical detail
· The ability to put yourself in the place of your audience and help them avoid common errors
· The ability to go through the procedure with concentrated attention and to capture that awareness on paper
· The willingness to go that extra distance and test your instructions on the audience for whom they are written
This chapter explores some of the features of instructions that can make them more complex to write, but easier for the reader to use. It also explains the common elements of instructions and how to write them.
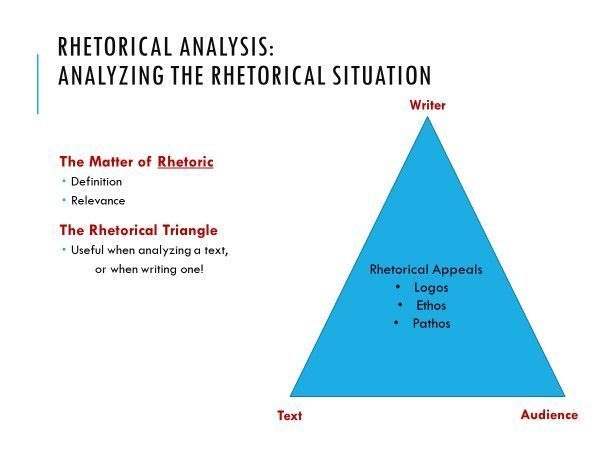
Instructions, like other types of texts, are shaped by a rhetorical situation. The choices technical writers make in regards to content and form depend on the purpose of the instructions, the intended audience, and the context in which the instructions are used. Altogether, the audience, purpose, and context of the instructions make up to the rhetorical situation. As you begin to plan your project, it is crucial to define the audience, purpose, and context for your instructions. Remember that defining your audience means defining its level of familiarity with the topic as well as other such details. (See chapter 2 for the discussion of audiences.)
Most importantly, if you are in a writing course, you will need to create a planning document that identifies the rhetorical situation and how it will inform the composition of your instructions. This will enable your instructor to assess how well your instructions are customized for the intended audience.
When writing your own instructions, consider the following ideas and questions regarding the rhetorical situation.
Purpose
In general, the purpose of a set of instructions is to guide the user through a series of steps that lead to the completion of a task. However, each set of instructions will also have a more specific outcome. Identifying what that specific outcome is will help you make more effective rhetorical decisions about content and design. Ask yourself:
· What are the specific intended outcome(s) of the instructions, e.g., building a doghouse, installing an air conditioner, etc.?
· Are there other purposes that the instructions serve, e.g., offering troubleshooting advice, teaching users how to accomplish additional, simple tasks necessary for reaching the main objective, defining unfamiliar terms, etc.?
Audience
Creating a profile of your audience (i.e. the primary intended user of the document) is integral for making thoughtful choices about scope, content, and design. For some projects, it is tempting to say your audience is “everyone or anyone,” but you are better off tailoring your instructions for a specific audience. Check out this airline safety video from Air New Zealand:
One or more interactive elements has been excluded from this version of the text. You can view them online here: https://open.library.okstate.edu/technicalandprofessionalwriting/?p=32#oembed-1
https://www.youtube.com/watch?v=qOw44VFNk8Y
Ostensibly, the audience for the video is everyone and anyone (because just about anyone could be on a flight), but Air New Zealand tailor their instructions to appeal to a very specific audience (i.e. fans of The Hobbit), while also making it accessible to anyone on the flight. Customizing their instructions so specifically allows them to really grab their audience’s attention, even if the customization is not grounded on a universal appeal.
In order to draft your instructions to serve your audience, consider these questions before writing:
- Who is the primary audience? Who is the secondary audience?
- What is the primary audience’s familiarity or expertise regarding the topic of the instructions?
- What is the audience’s general comfort level with learning new skills related to the software, apps, craft, etc.?
- What is your audience’s “typical” approach to learning? How will your instructions address the audience’s learning style, goals, and task-related needs?
Context
Think of context as the temporal, social, technological, and cultural situation surrounding the creation and use of the instructions. The following questions will help you identify the context:
- How much time will you have to complete this set of instructions?
- Are there time constraints the user might encounter when reading the instructions or performing the process?
- Is there a degree of urgency to the rhetorical situation that might dictate the instruction’s pace or flow? How will the design of the document contribute to the pace or flow? For example, a guide on how to properly administer CPR might need to anticipate a reader who is under duress and needs information quickly so that they can save someone’s life, whereas instructions on how to play “Mary Had a Little Lamb” on the violin will be read by a recreational audience that may not feel the same pressure or exigence.
- What technological constraints must you consider in writing the instructions? Consider your skills with technology and level of access.
- How will your audience gain access to the instructions? For example, your audience may access it online via a company website on a desktop computer or their smart phones. Will they need to print it?
- What additional tools or materials are you assuming the audience already has? Will they have access to the technology or materials needed to follow the instructions? For example, to successfully build a bookshelf, the user will need a hammer, screwdriver, and open work area.
- From what cultural perspective are you writing the instructions? Will the audience share this same cultural context? For example, a German recipe that calls for vanilla sugar, an ingredient not readily available in the United States, may need to be modified for American users.
Once you have described the rhetorical situation, you can begin drafting your set of instructions. A comprehensive set of instructions contains many components. These are listed in the next section. This section provides a foundation for your draft.
Number of Tasks
How many tasks are there in the procedure you are writing about? The term procedure refers to the whole set of activities your instructions are intended to discuss. A task is a semi-independent group of actions within the procedure: for example making spaghetti and meatballs is a procedure that—while containing dozen of individual steps—can be broken down into three distinct tasks: 1) preparing the meatballs; 2) stewing the sauce; and 3) boiling the pasta.
A simple procedure like changing the oil in a car contains only one task; there are no semi-independent groupings of activities. A more complex procedure such as making spaghetti and meatballs, or constructing a doghouse, contains many semi-independent tasks. For example, constructing a doghouse would include the tasks of: leveling the ground, setting the foundation, building the floor, constructing the walls, adding the roof. The instructions for the Kobolt Swing Trimmer are organized by tasks – Assembly Instructions and Operating Instructions. The Assembly Instructions include further divisions related to particular parts such as the guard and the front handle.
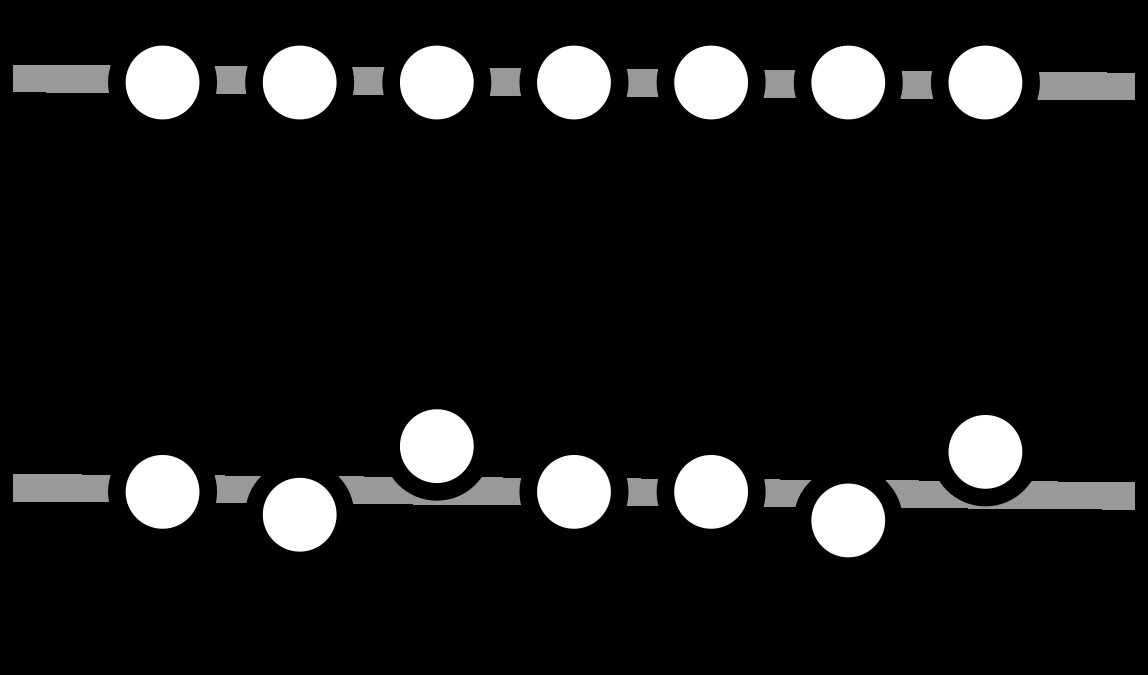
In Figure 1, the procedure is the total sum of the actions needed to build a doghouse. The introduction and list of tools and supplies is not part of the procedure. In this schematic those sections are represented in gray.
The separate tasks that comprise the procedure are represented by the blue boxes: Level the Ground and Set the Foundation. The steps are the individual actions taken in sequential order and are nested within the tasks.
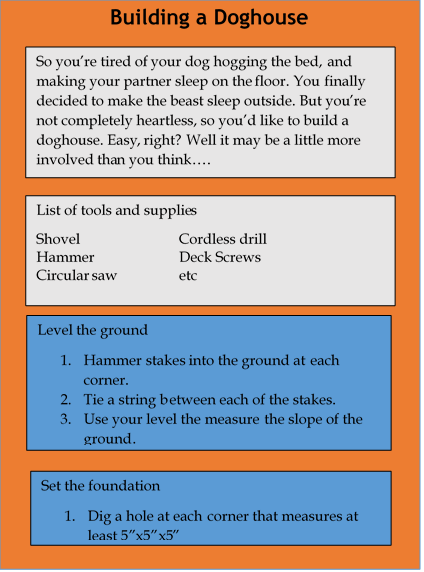
Figure 1: The procedure encompasses all of the actions in your instructions. You might think of it as the title of the process.
Some instructions have only a single task, but have many steps within that single task. For example, imagine a set of instructions for assembling a swing set. There could be over a 100 steps. That can be daunting. If there are no natural, semi-independent tasks, or if there are too many semi-independent tasks for clearly denoted task sections, you can simply group similar and related steps into phases, and start renumbering the steps at each new phase. A phase then is a group of similar steps within a single-task procedure. In the swing-set example, setting up the frame would be a phase; anchoring the thing in the ground would be another; assembling the box swing would be still another.
Returning to the spaghetti and meatballs example, the tasks—1) preparing the meatballs; 2) stewing the sauce; and 3) boiling the pasta—can be broken down further into phases. The task of preparing the meatballs can be divided into several phases—seasoning the meat, forming the meatballs, searing the meatballs—and each of these phases will include multiple action steps. Phases for stewing the sauce might include: dicing onions, dicing garlic, browning the vegetables in the pan, adding herbs, and simmering the sauce. But since there are a limited number of steps within these phases, and the procedure already contains natural, semi-independent tasks, there is no need to add extra phases to preparing spaghetti and meatballs.
For further discussion, see this resource on task analysis (https://www.prismnet.com/~hcexres/textbook/task_analysis.html).
Groupings of Tasks
Listing tasks may not be all that you need to do. There may be so many tasks that you must group them so that readers can find individual ones more easily. For example, the following are common task groupings in instructions:
- Unpacking and setup tasks
- Installing and customizing tasks
- Basic operating tasks
- Routine maintenance tasks
- Troubleshooting tasks
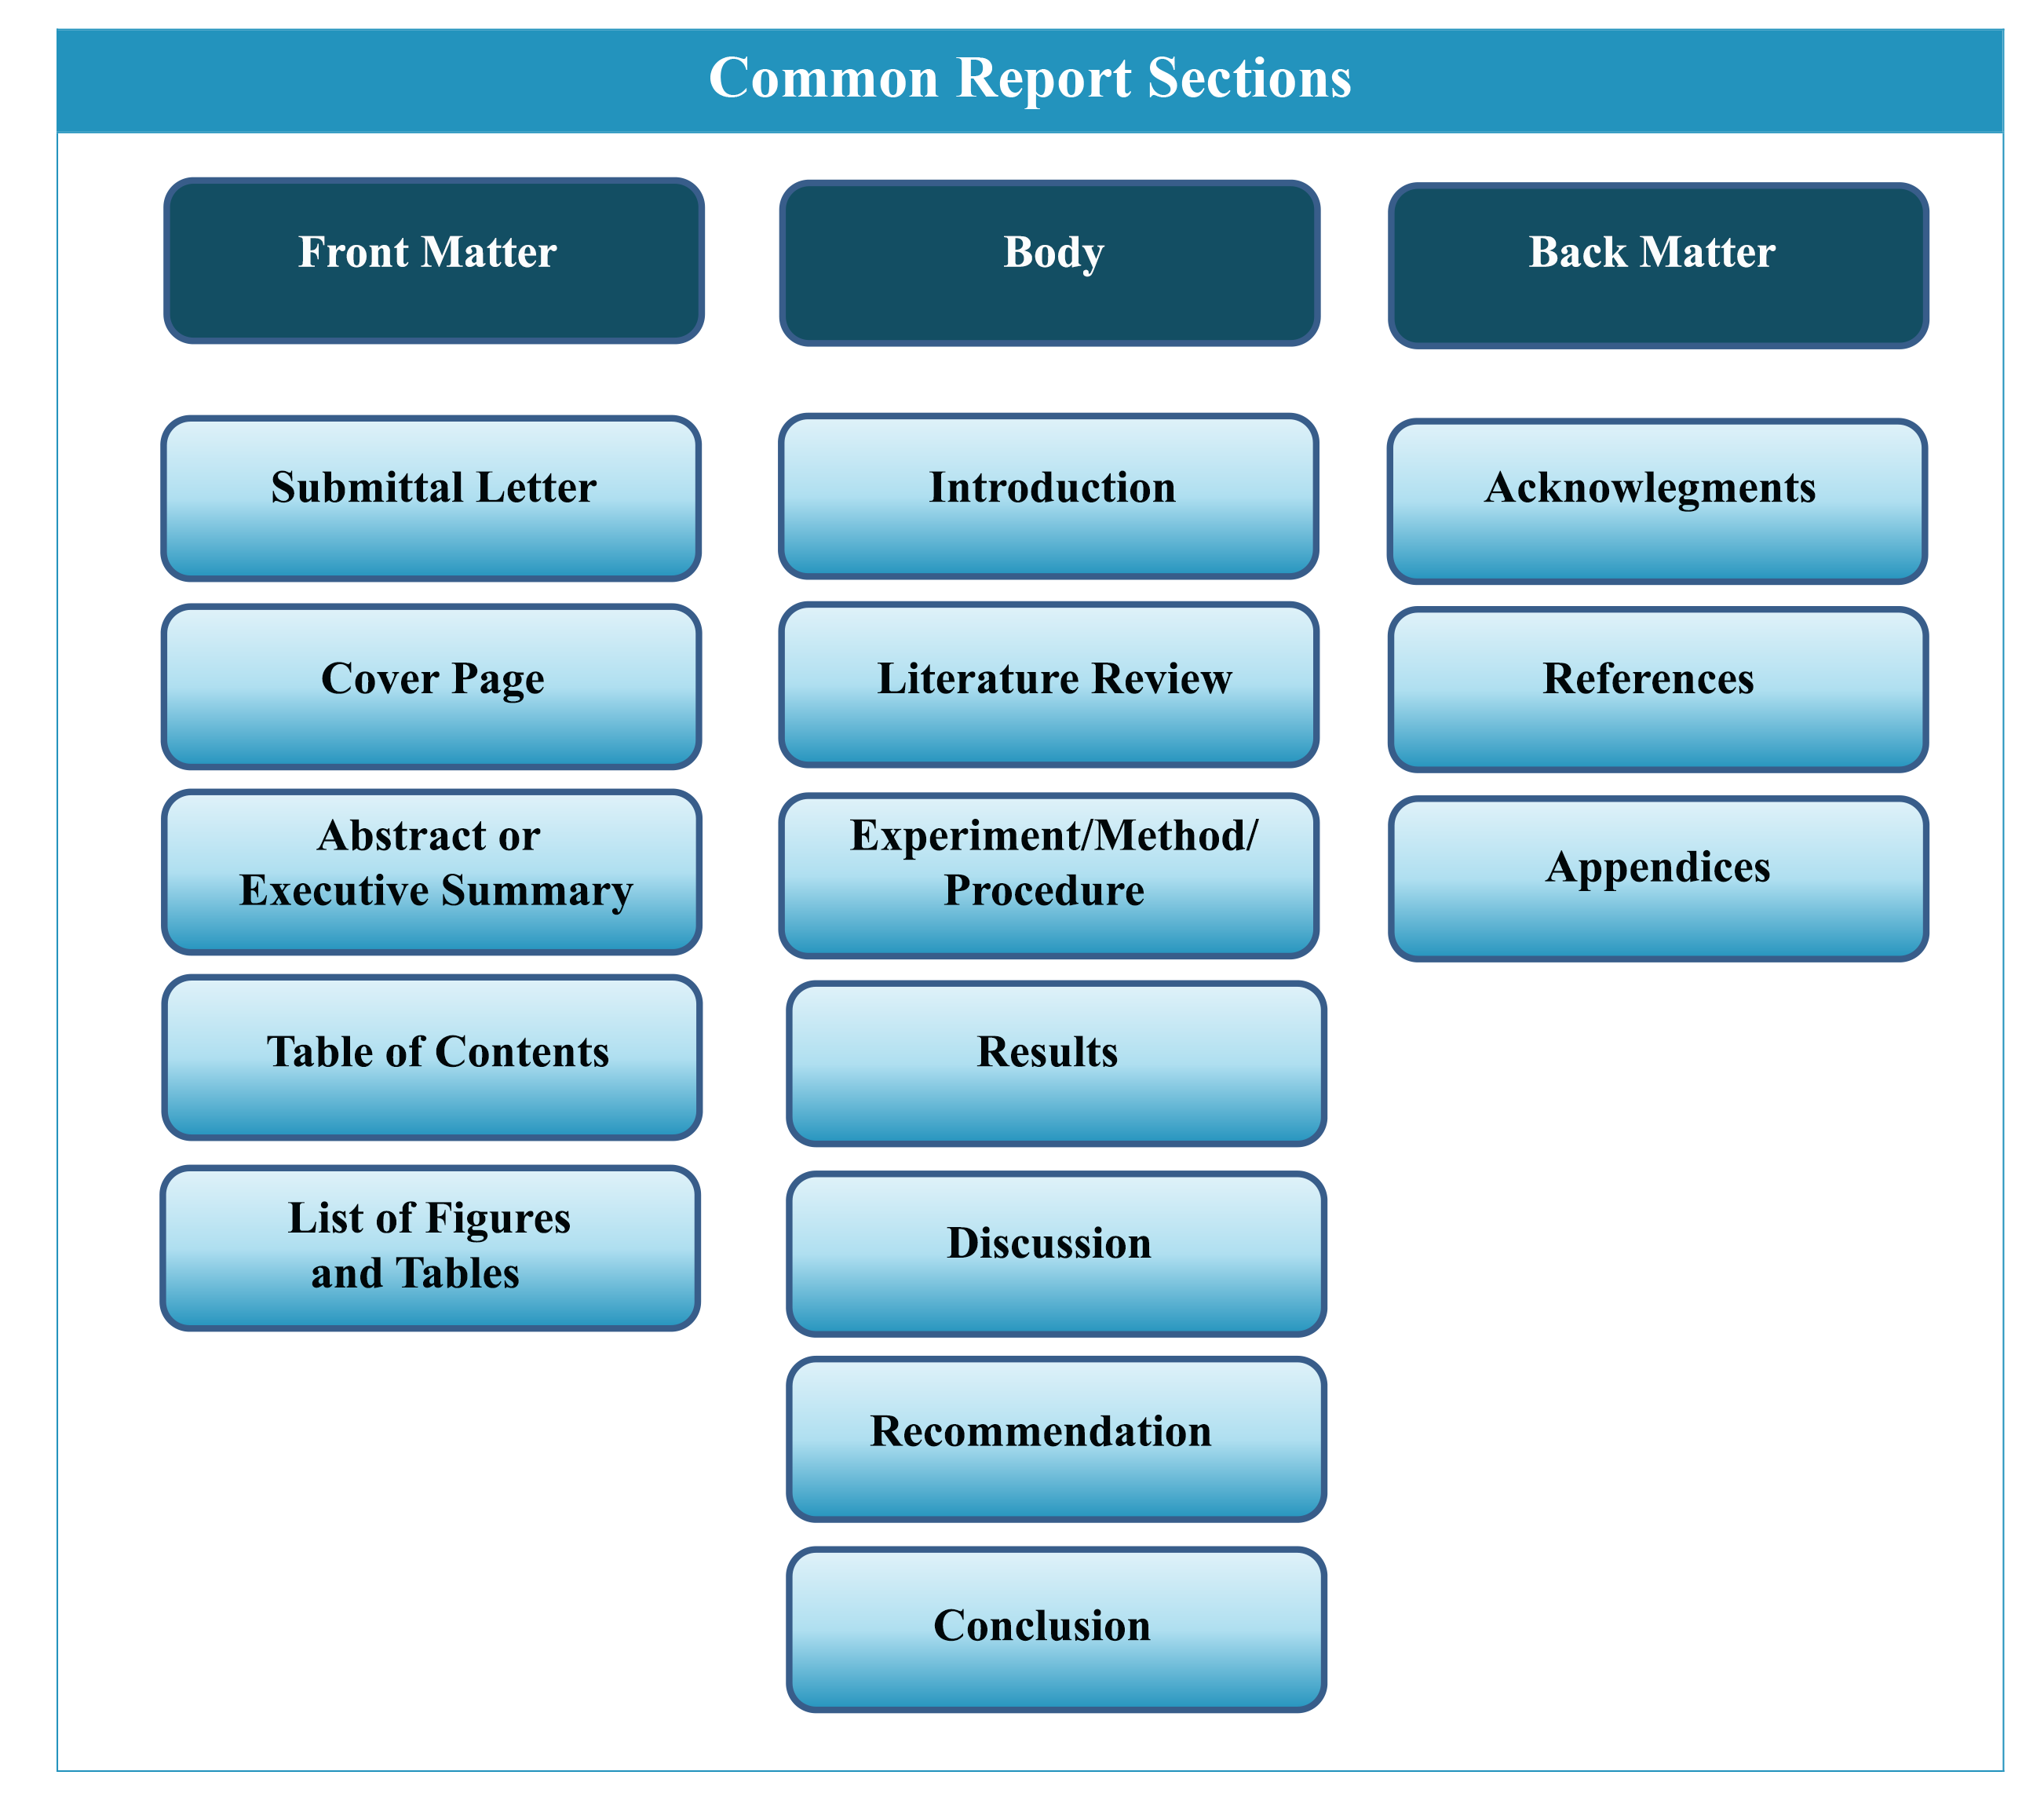
The standard sections of instructions include front matter, an introduction, the procedure (a series of numbered steps divided into tasks or phases), a conclusion, and back matter. Some sets of instructions may not use all of these sections or label them in this way. Extensive front and back matter, for example, are often found in longer, more complex manuals.
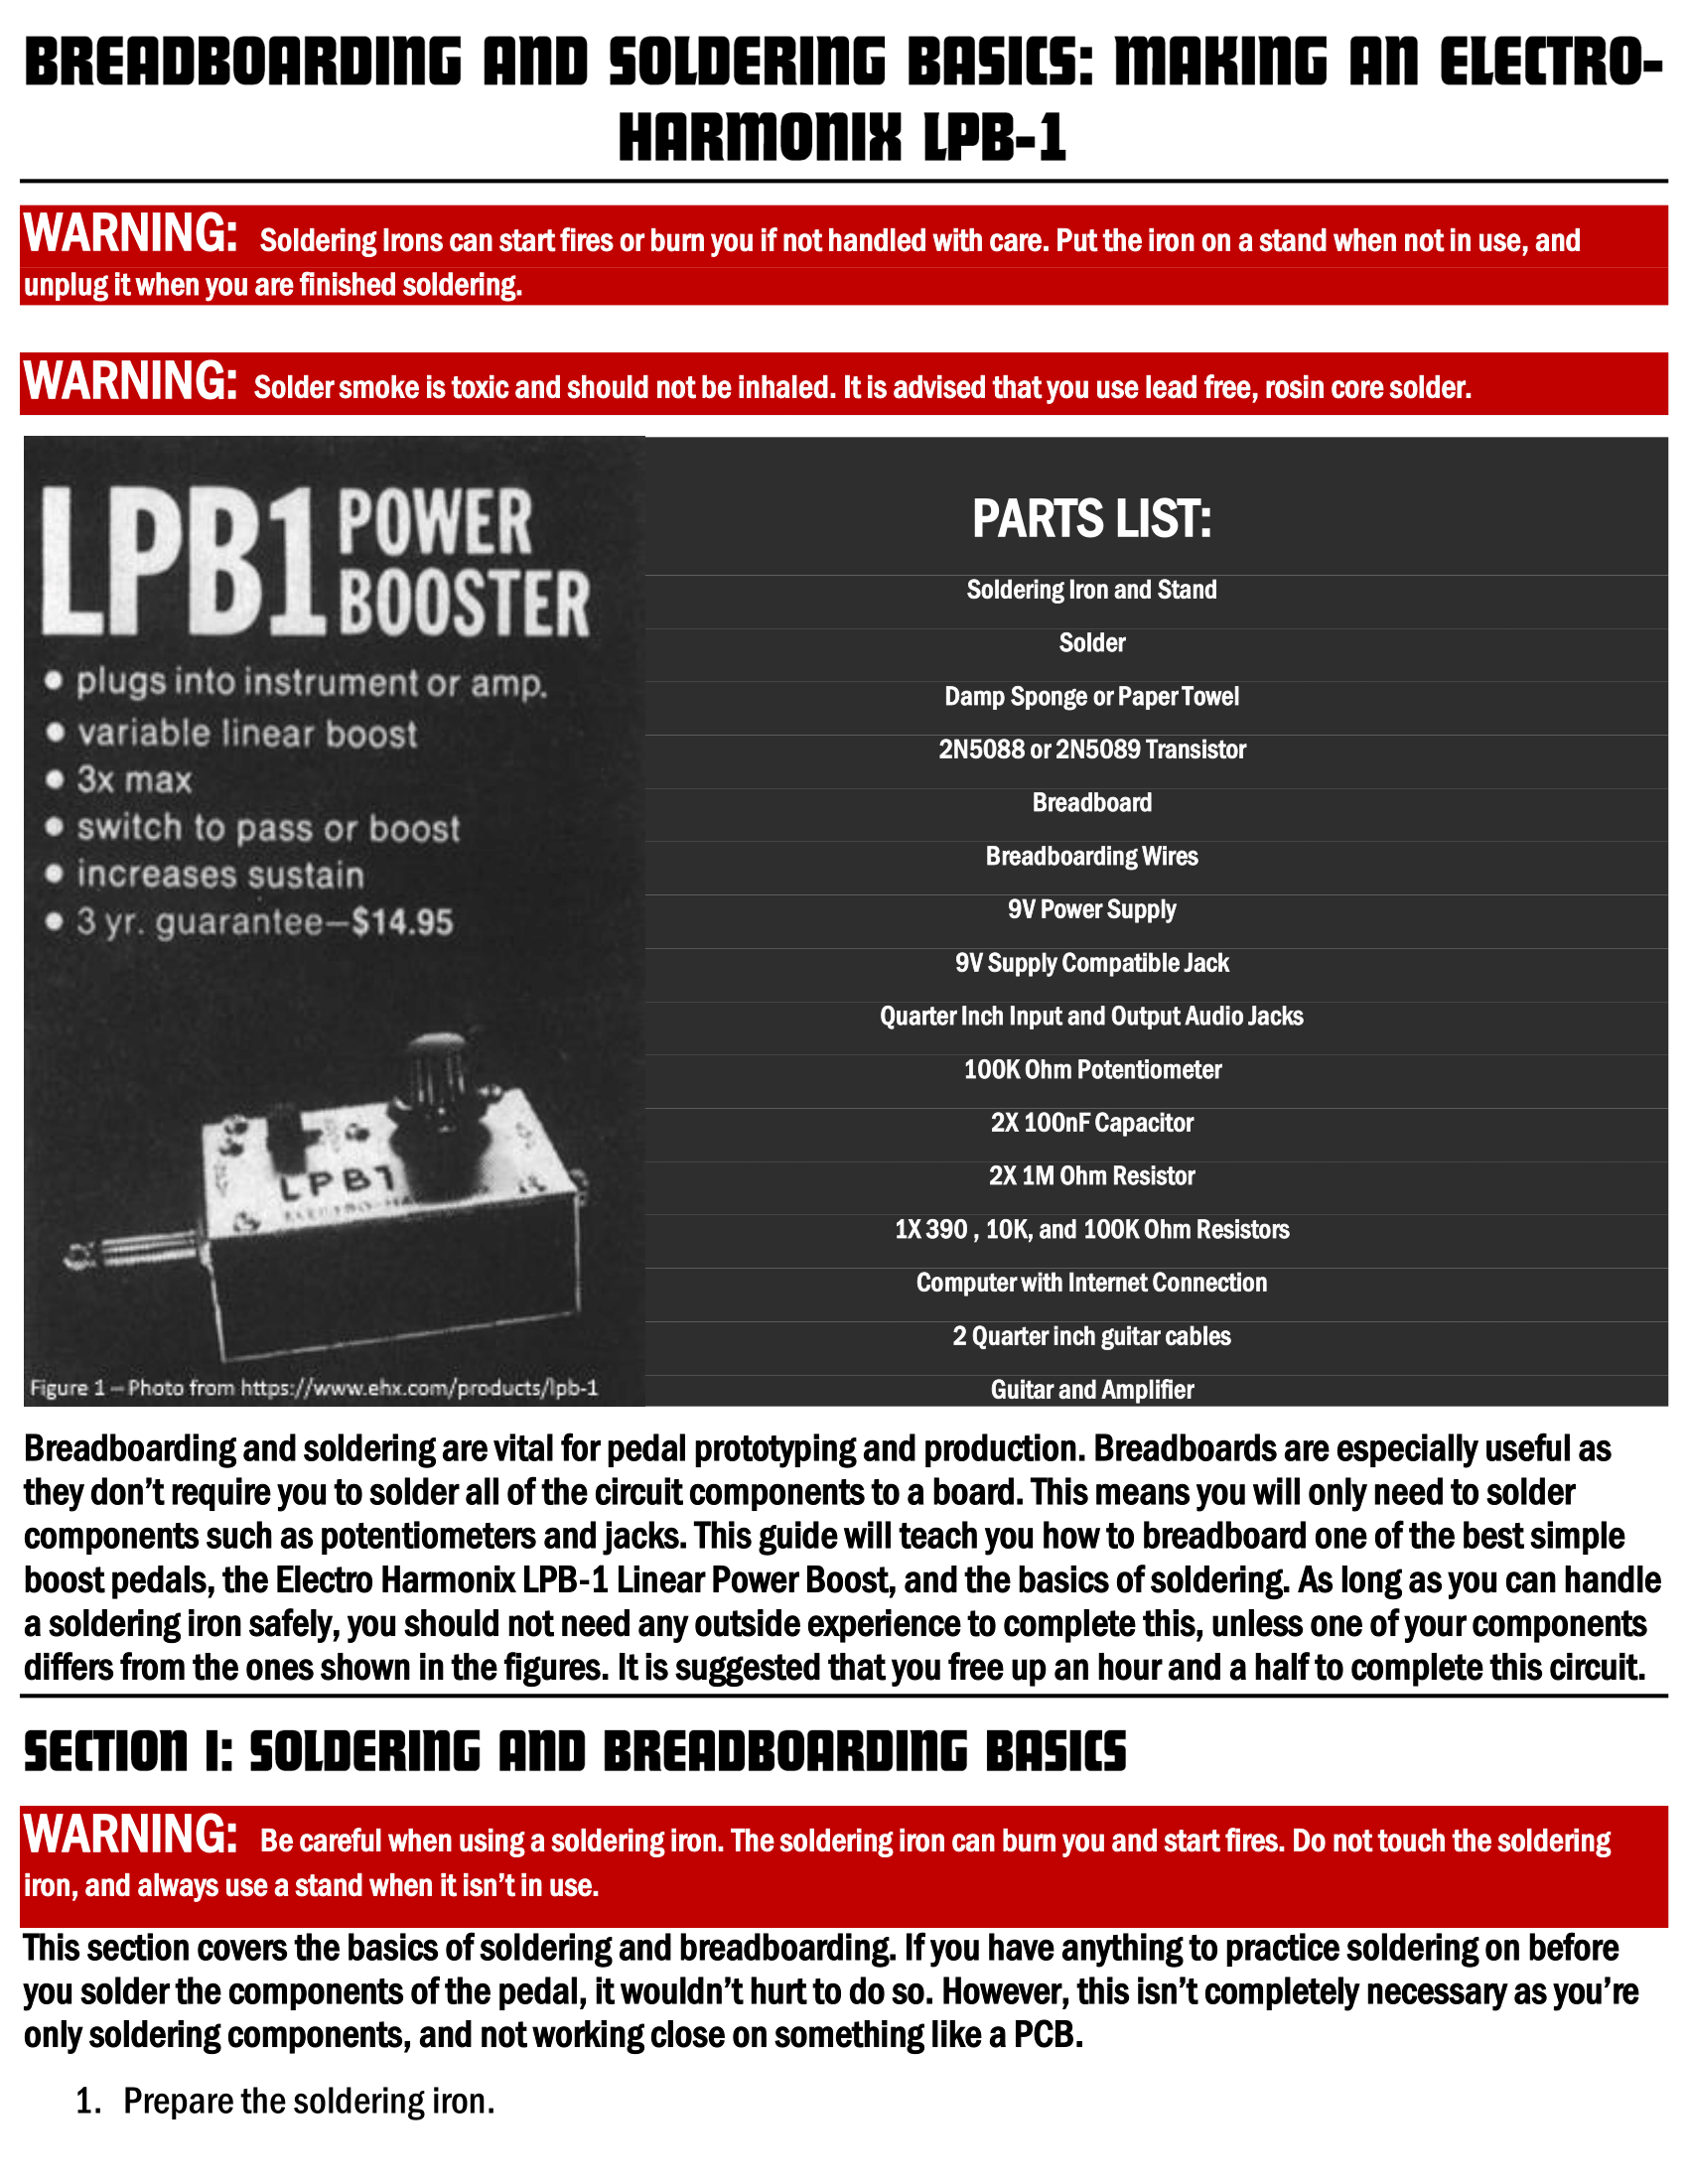
Most sets of instructions, however, contain an introduction that provides information necessary for completing the steps safely and efficiently. The introduction may include an explanation of who should carry out the task (maybe the user needs to have proficiency in a certain skill), the materials needed, any precautions that the user should take (safety tips or other warnings), and an estimate for how long the process will take, among other elements. It is often necessary to include an explanation of why the user should follow the instructions. For example, instructions for changing the oil in a car may explain why the task is necessary for the proper functioning of the vehicle.
Following this introductory material is the sequence of step-by-step instructions, divided into separate tasks. See the section below for how to draft clear and effective steps.
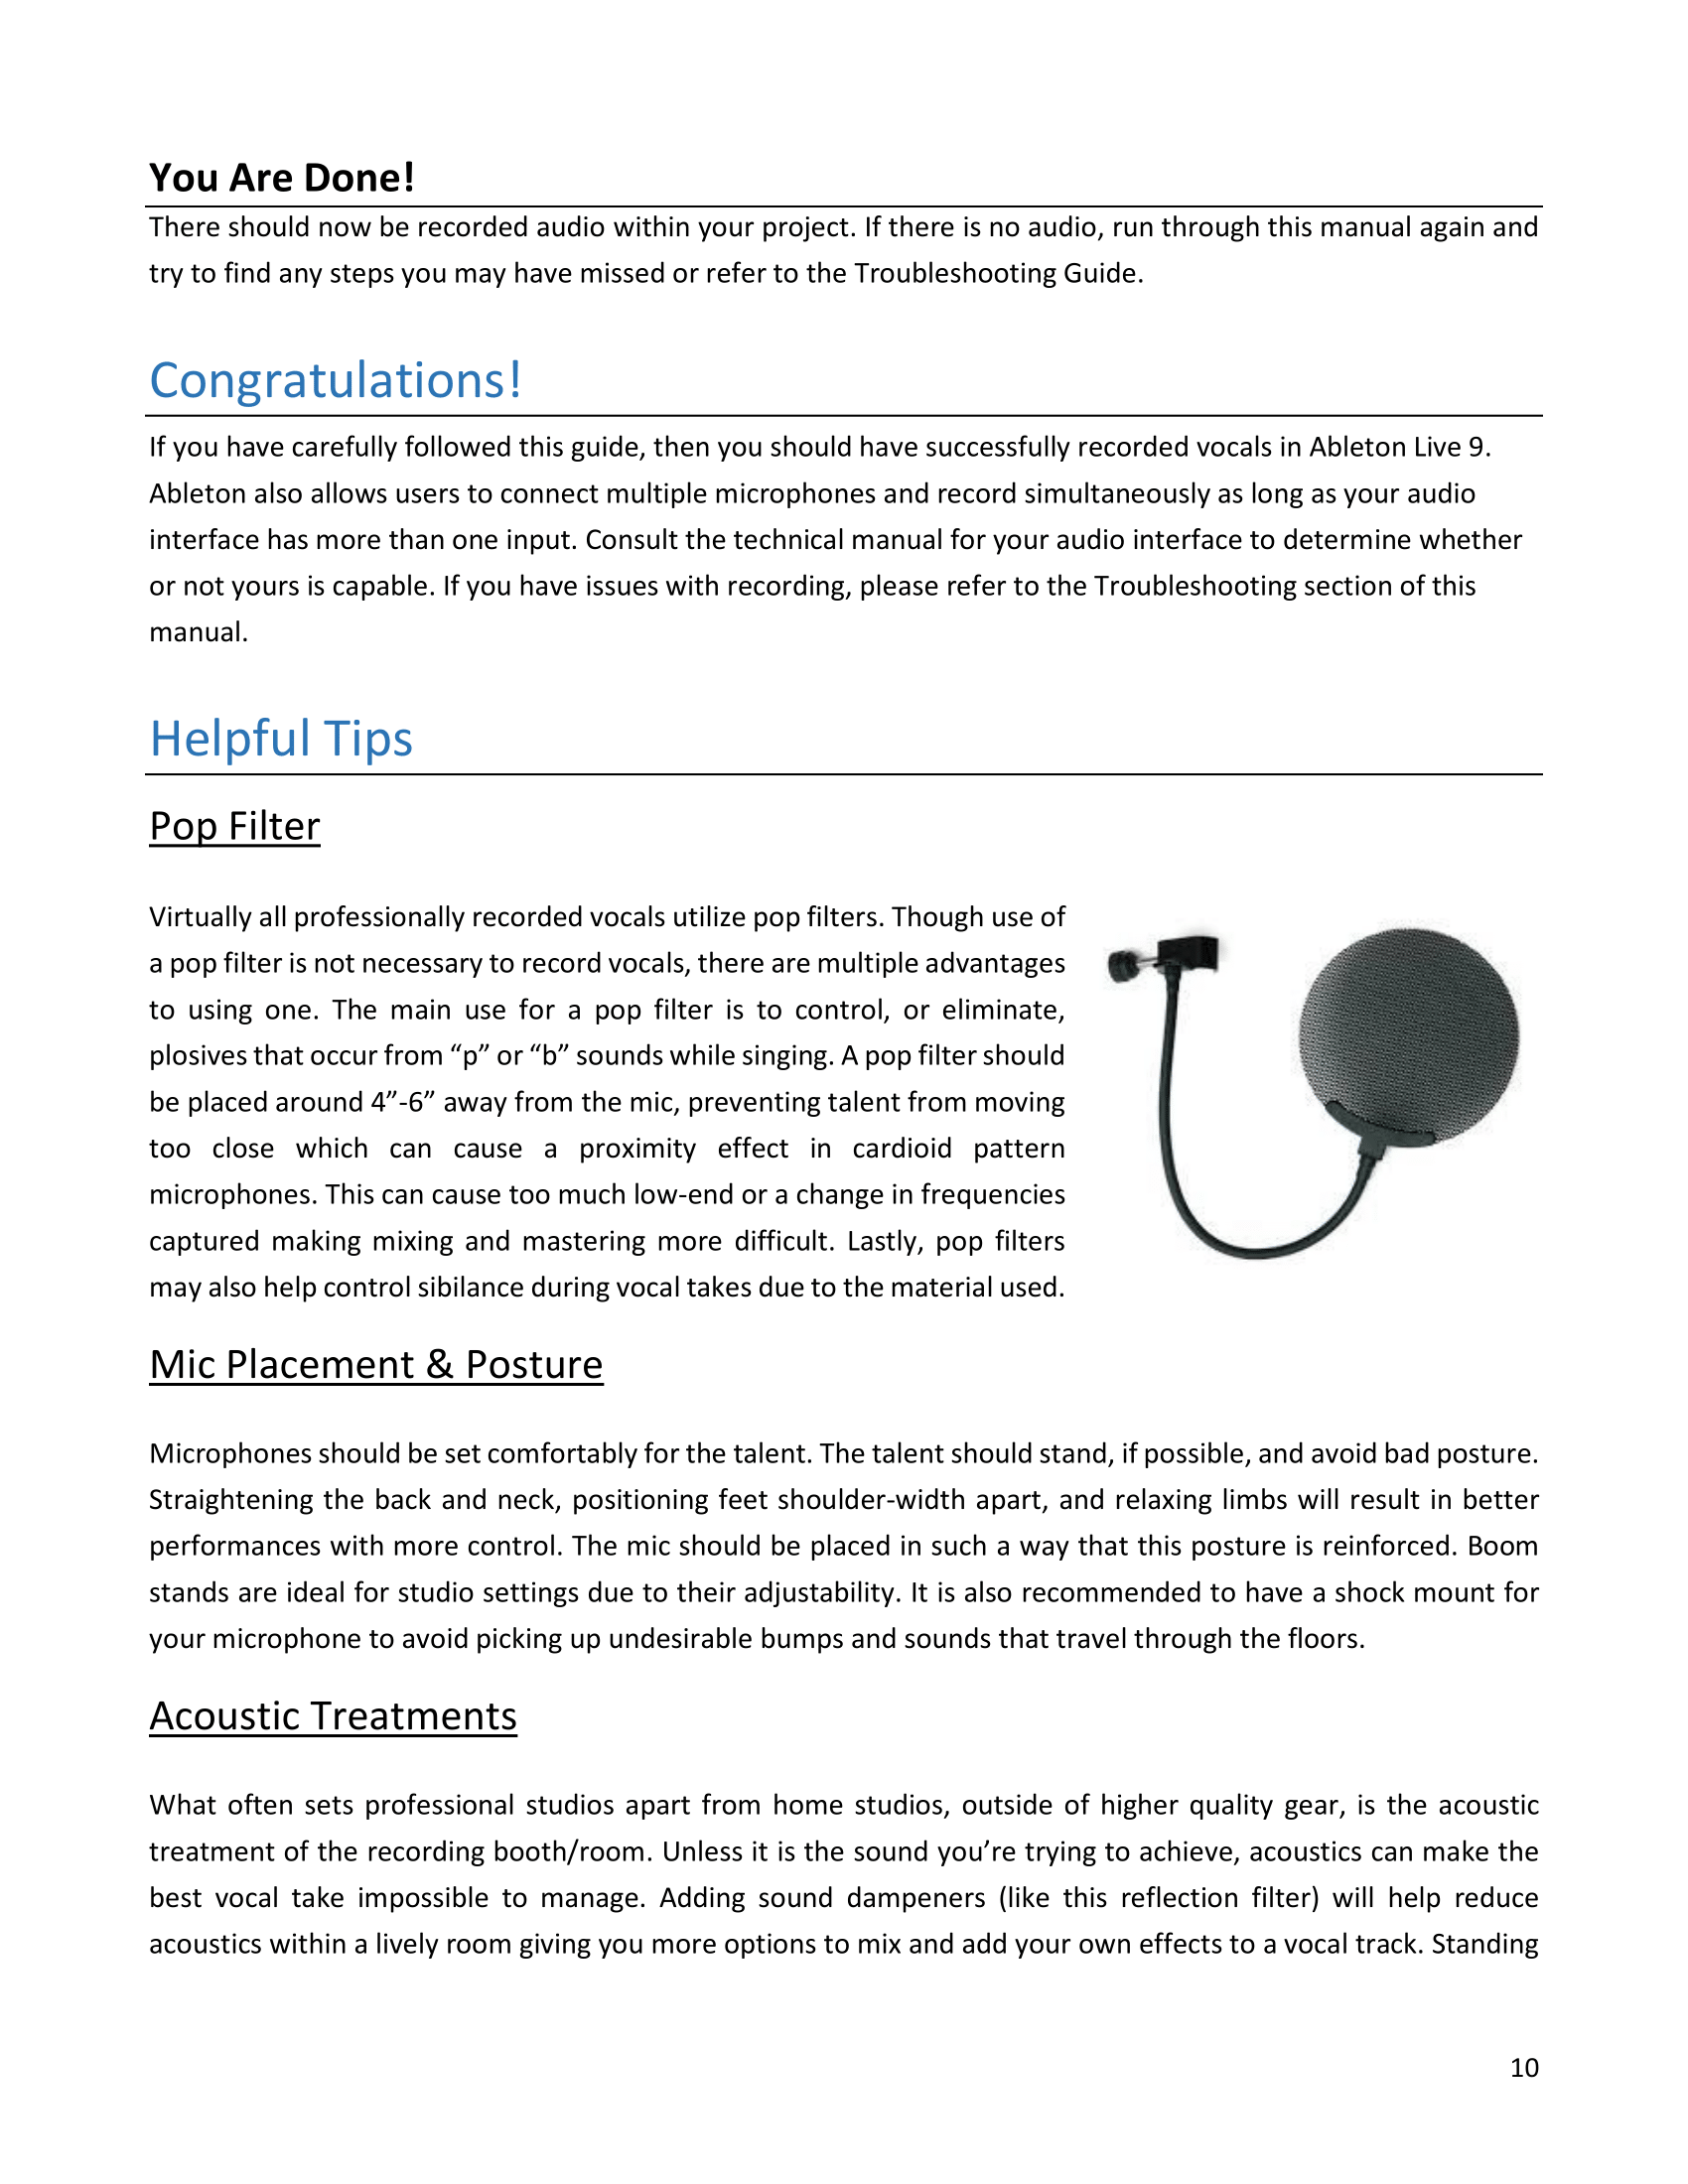
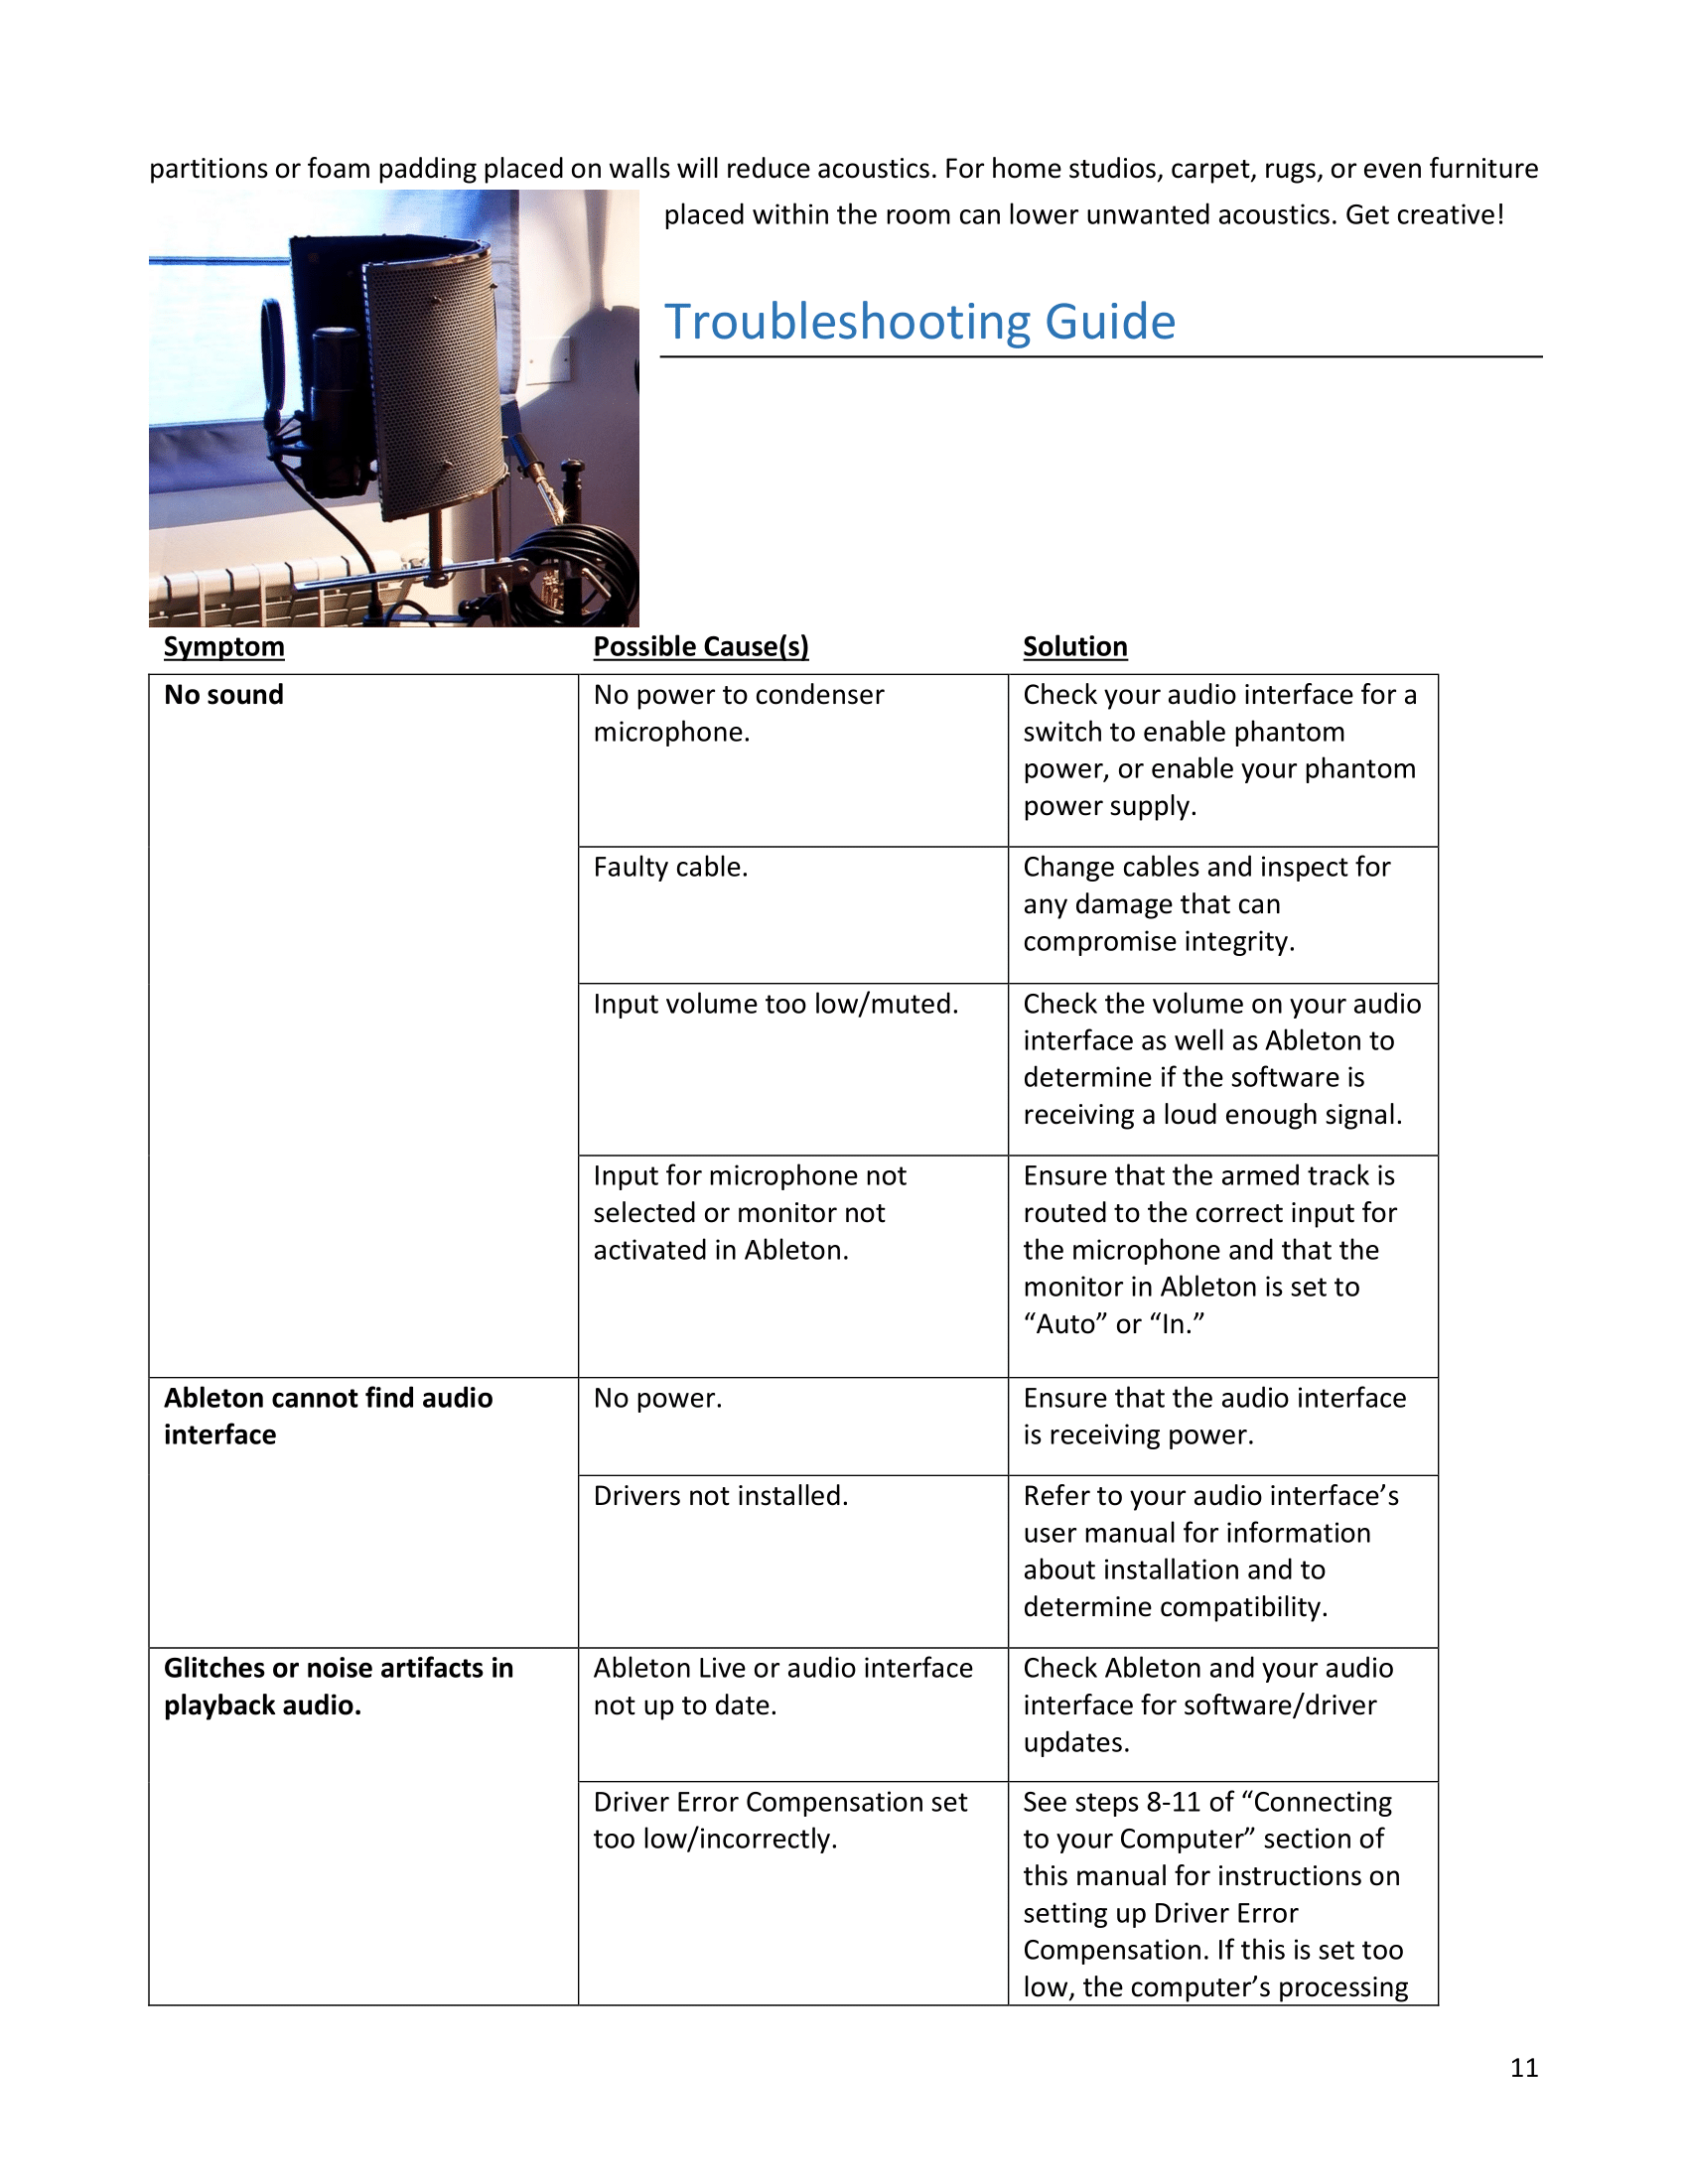
Lastly, instructions typically include some closing sections or appendices such as a “Troubleshooting Guide” or a section for “Tips” to help users address common problems that they may encounter while following the instructions or after completing the process.
The following is a review of these different parts you will commonly find in instructions. Most of them should be included in all instructions, but do not assume that all of them always need to be present, or that they must follow this exact order. There are other possible sections that could be included in instructions. However, all instructions should have at minimum an Opening/Introduction, a Body with numbered steps that are divided into separate tasks or phases, and a Conclusion and/or Closing sections.
As you read the following on common sections in instructions, check out the sample instructions linked at the end of this chapter. Figure 2 provides a simple schematic of the foundational elements for a set of instructions.

Figure 2: Schematic view of instructions. Remember that this is a typical or common model for the contents and organization — many others are possible.
Introduction/Opening
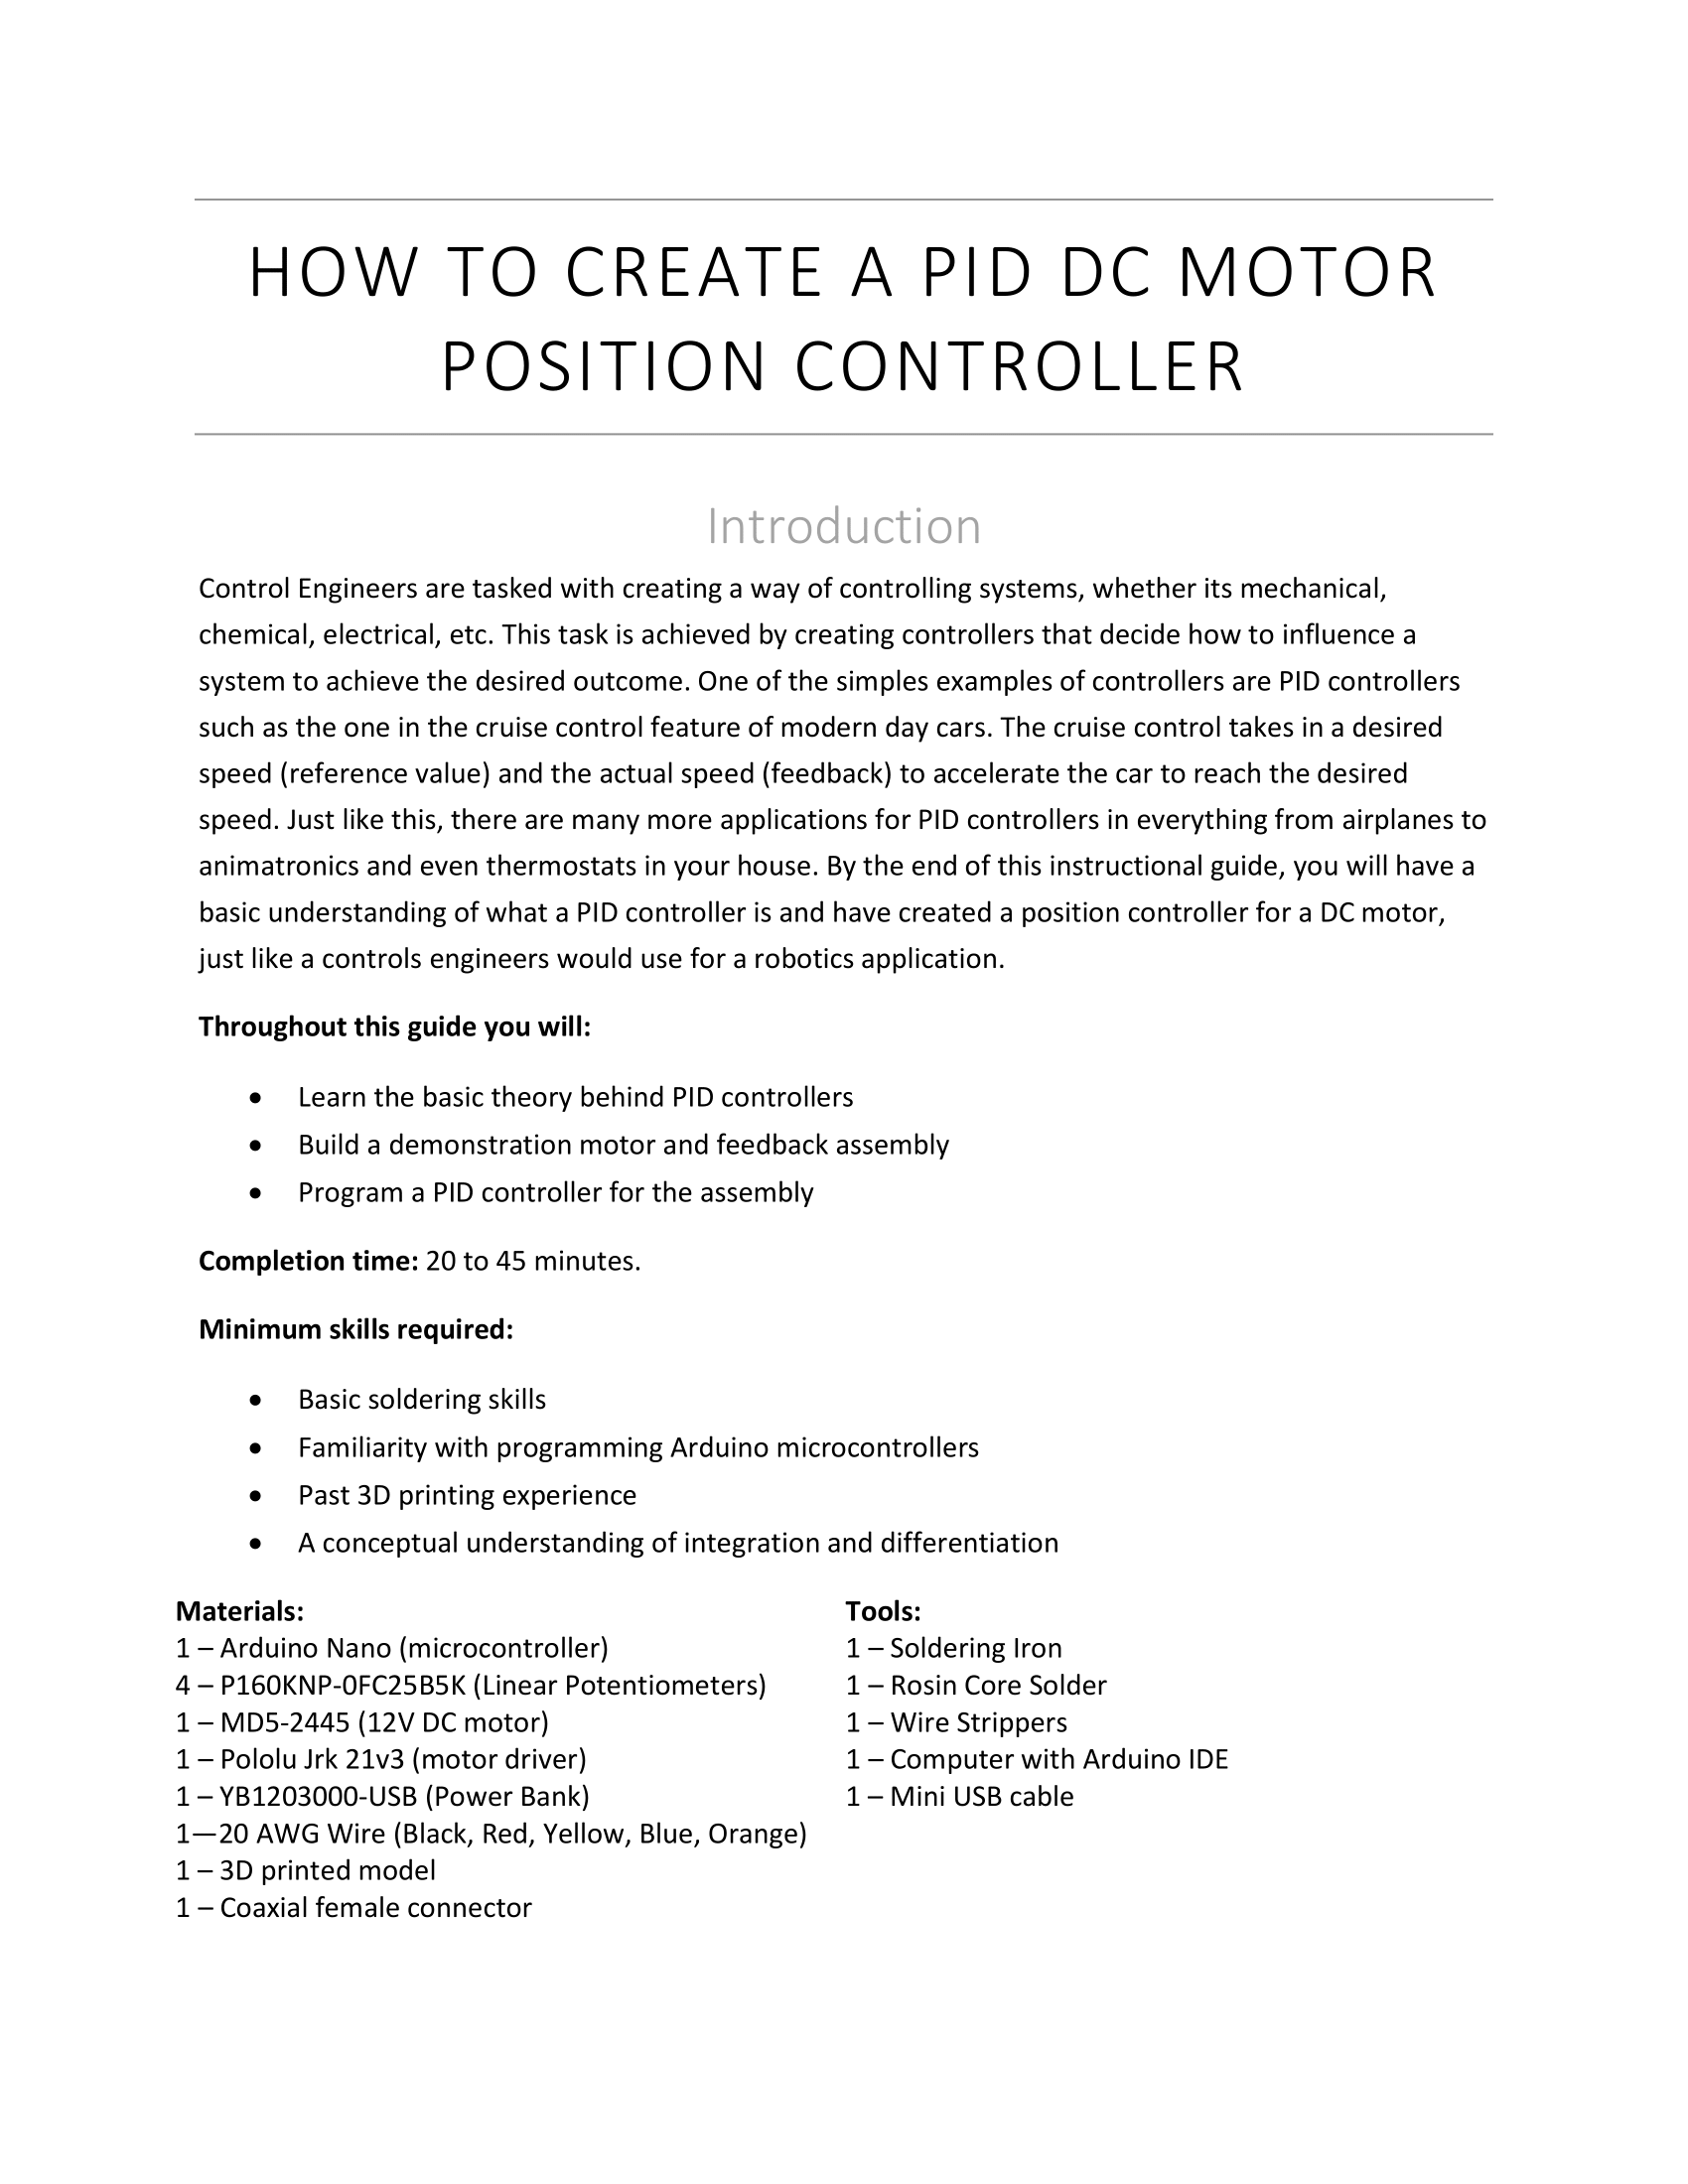
Before you even get to the introduction, you need to craft a clear title that is easy to understand. You want to be detailed and specific, but also succinct. For example, some good titles would include: “How to Clean a Freshwater Aquarium,” “How to Install Long-Tube Headers on a 1999 Trans Am,” “Cleaning a Bathroom: Instructions for College Students Living on Their Own for the First Time.”
Plan the introduction to your instructions carefully. Just as the title should provide your reader with a good idea of what the instructions involve, the goal of your introduction is to give your reader general information about the process. What is it? Why should it be done? The introduction should contain an overview of the process and why it is important. Often, the writer lists the benefits of completing the process so that the reader feels good about the task they are about to complete.
The introduction/opening should do the following:
- Include a title
- Describe the goal and/or purpose of the instructions. Richard Johnson-Sheehan[1] provides the following verbs as possible options:
to instruct
to show
to illustrate
to explain
to guide
to lead
to direct
to train
to tutor
- Identify the intended readers and what knowledge and background information or skills they will need to understand the instructions and complete the procedure.
- Indicate the conditions when these instructions should (or should not) be used.
- Give an overview of the contents of the instructions.
- Provide motivation and stress the importance of the task (i.e., what does the audience stand to gain from learning this information? How will it prove useful? Why should the reader follow these instructions? What will happen if they do not?)
- Indicate the time for completion for people of varying skill-levels.
The following sections should be included as part of the opening of the instructions before the tasks begin. They can be folded in as subheadings of the introduction, or they can stand on their own, depending on the rhetorical situation.
Precautionary Statements/Warnings
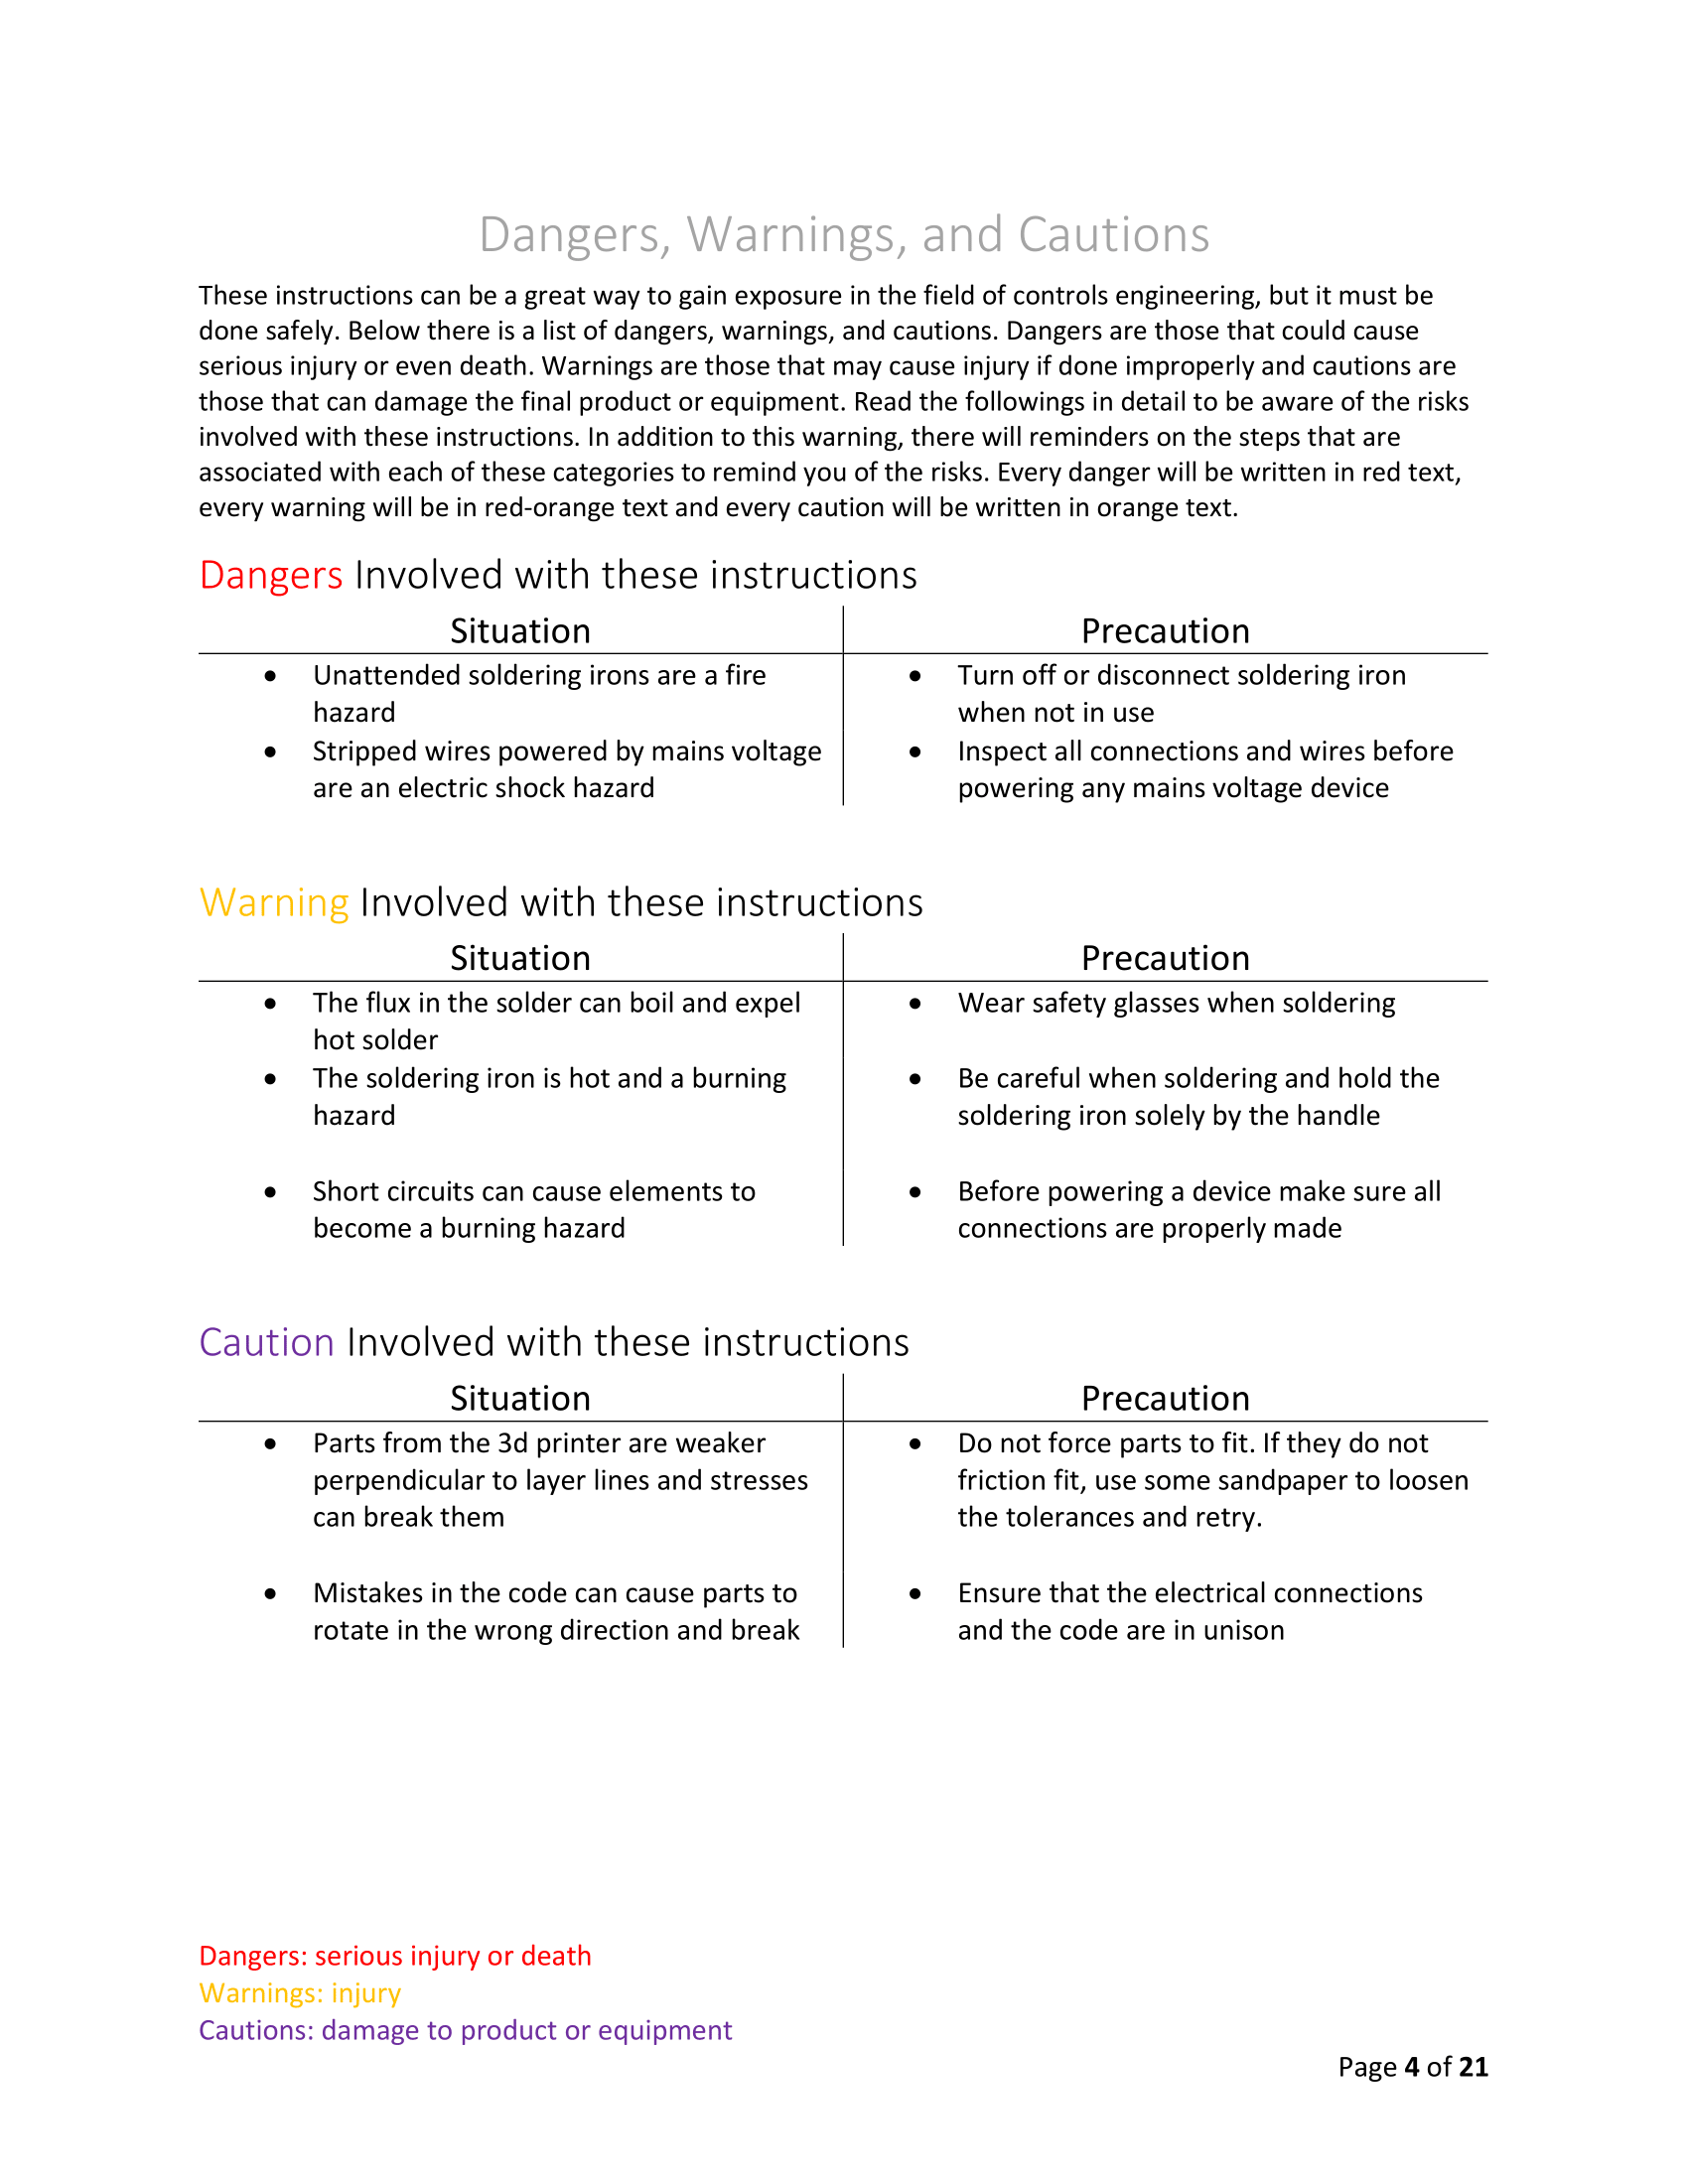
Instructions must alert readers to the possibility of damaging the equipment, botching the procedure, and injuring themselves or others. For these situations, use special notices (https://en.wikipedia.org/wiki/Precautionary_statement) —notice, caution, warning, and danger notifications.
- The “Notice” precaution is the lowest level statement. The standard color for notices is blue. Use it to indicate when there is a risk to damage property or equipment. You can also use it to draw attention to important operational considerations. There is no threat to bodily harm or safety with a notice.
- A “Caution” statement should include the safety symbol of an exclamation mark within a triangle. The standard color for caution statements and symbols is yellow. All the other higher warning should include this symbol as well, in the appropriate color code. It indicates there is a “non-immediate or potential hazard” for minor injury to a user or general public.
- A “Warning” statement appears in orange and indicates that death and/or serious injury could result to users and the public. These signs are not used to indicate property or material damage, but rather the potential for personal bodily injury or death.
- A “Danger” statement is the highest level precautionary statement and should appear in red. It indicates a situation with an immediate hazard that will result in death or serious injury. It is not used for property damage.
If any part of the procedure merits a precautionary statement or warning, you must include a statement at the beginning of your instructions, either as part of the Introduction/Opening or as a separate section before the tasks begin. Each of these warnings must always contain the corresponding colors and icons to help them stand out on the page. See the link above for more information. See below for more information about precautionary statements.
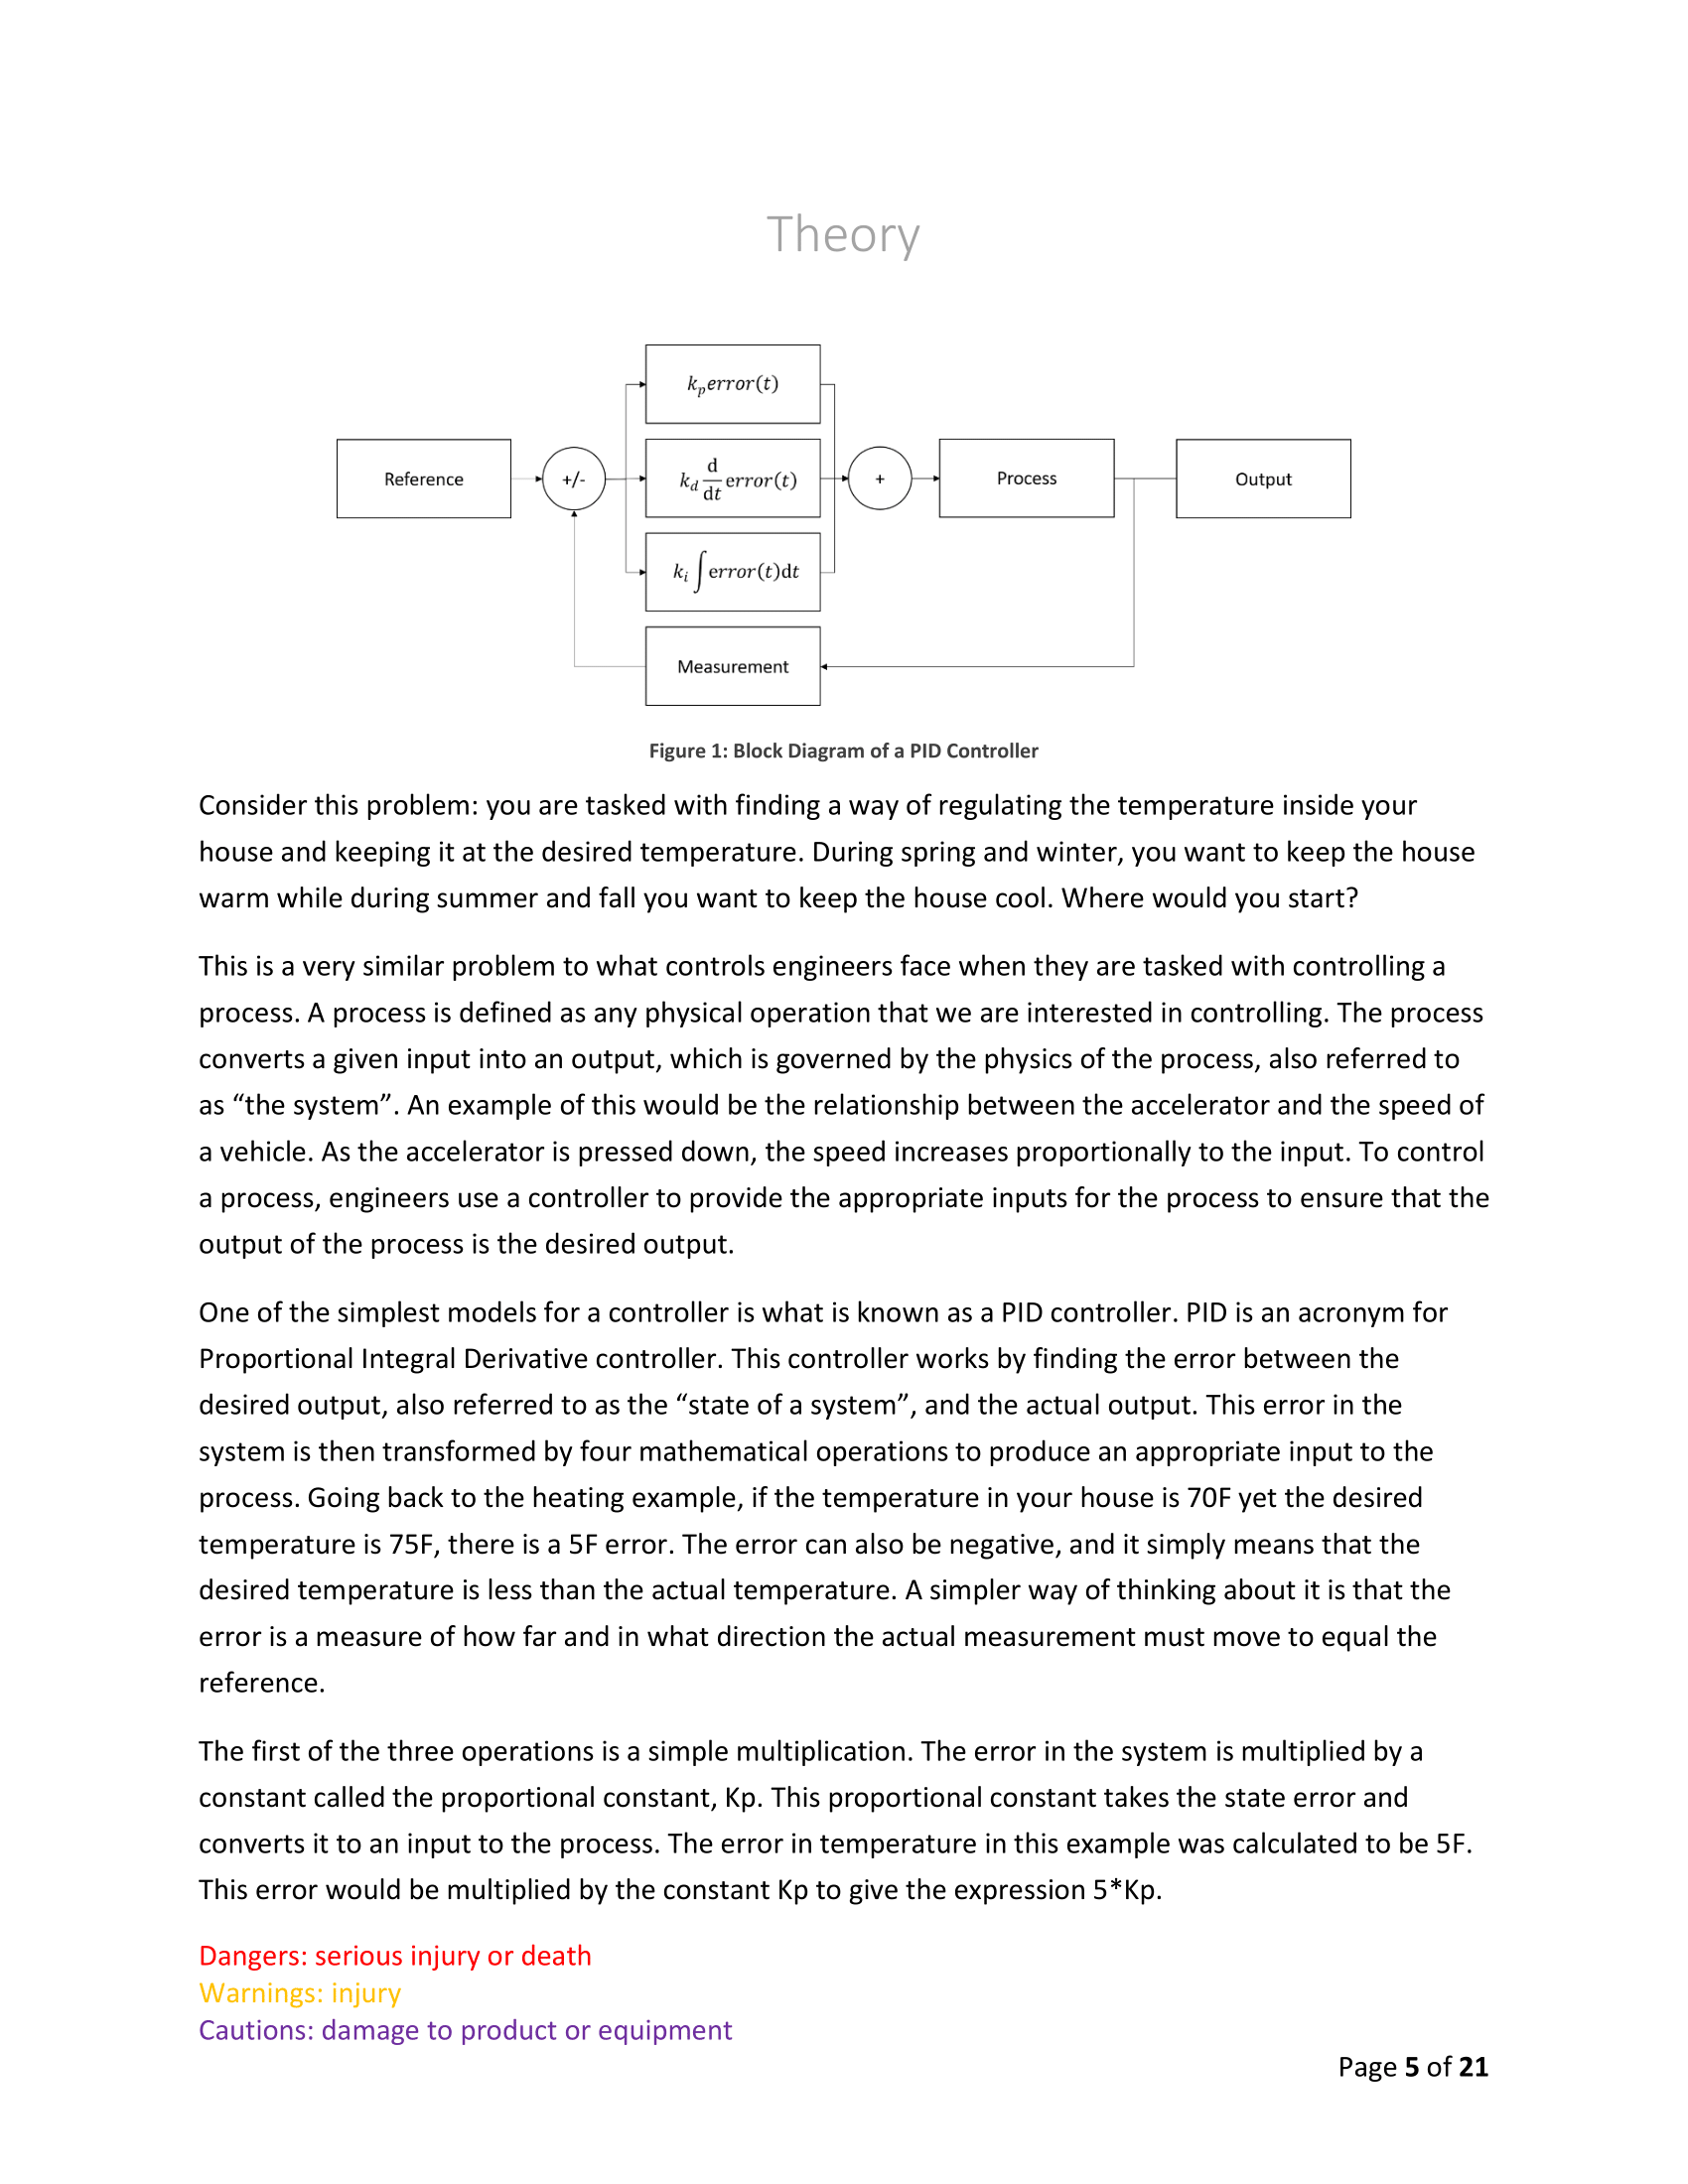
Technical Background or Theory
For some instructions you will need to provide a more thorough discussion of background related to the procedure. For certain instructions, this background is critical—otherwise, the steps in the procedure make no sense. For example, you may have had some experience with those software applets in which you define your own colors by nudging red, green, and blue slider bars around. To really understand what you are doing, you need to have some background on color. Similarly, you can imagine that, for certain instructions using cameras, some theory might be needed as well.
List of Parts, Tools, Materials, Equipment, and/or Supplies
Most instructions include a list of things you need to gather before you start the procedure. This includes equipment, the tools you use in the procedure (such as mixing bowls, spoons, bread pans, hammers, drills, and saws) and supplies, the things that are consumed in the procedure (such as wood, paint, oil, flour, and nails). In instructions, these are typically listed in a simple vertical list or in a two-column list. It may help to notify your reader where they can acquire the equipment or supplies. The audience needs to know and gather all the materials necessary to complete the procedure before they begin any of the tasks.
Step-by-Step Instructions
When you get to the actual writing of the steps, there are several things to keep in mind: (1) the structure and format of those steps, (2) supplementary information that might be needed, and (3) the point of view and general writing style.
Structure and Format
Normally, we imagine a set of instructions as being formatted as vertical numbered lists, and most are in fact. There are some variations, however, as well as some other considerations:
- Fixed-order steps: must be performed in the order presented. For example, if you are changing the oil in a car, draining the oil is a step that must come before putting in the new oil. These are numbered lists (usually, vertical numbered lists).
- Variable-order steps: steps that can be performed in practically any order. Good examples are those troubleshooting guides that tell you to check this, then check that, when you are trying to fix something. You can do these steps in practically any order. With this type, the bulleted list is the appropriate format.
- Alternate steps: those in which two or more ways to accomplish the same thing are presented. Alternate steps are also used when various conditions might exist. Use bulleted lists with this type, with OR inserted between the alternatives, or the lead-in indicating that alternatives are about to be presented.
- Nested steps: in some cases, individual steps within a procedure can be rather complex in their own right and need to be broken down into substeps. In this case, you indent further and sequence the substeps as a, b, c, and so on.
- “Stepless” instructions: some instructions really cannot use numbered vertical list and that do little if any straightforward instructional-style directing of the reader. Some situations must be so generalized, or so variable, that steps cannot be stated. Generally, these are not appropriate for a classroom assignment. In your classes, you will need to demonstrate your mastery of the form with more traditional, straight-forward, sequentially numbered steps, otherwise it may begin to resemble a collection of tips or advice.
In any case, remember to divide your procedure into separate tasks or phases. It is easier for your audience to complete the procedure if they can work through it in smaller chunks.
Supplementary Discussion
Often, it is not enough simply to tell readers to do this or to do that. They need additional explanatory information such as how the thing should look before and after the step; why they should care about doing this step; what mechanical principle is behind what they are doing; even more micro-level explanation of the step—discussion of the specific actions that make up the step. When including supplementary information, it should be formatted as a “Note” or “Tip” similarly to how you would format a “Notice.” This type of supplementary information derives from “craft knowledge.” In certain circumstances, especially less formal instructions, it is even appropriate to include personal narrative to help convey your craft knowledge.[2]
The problem with supplementary discussion, however, is that it can hide the actual step. You want the actual step—the specific actions the reader is to take—to stand out. You do not want it buried in a wall of words. There are at least two techniques to avoid this problem: you can split the instruction from the supplementary information into separate paragraphs; or you can bold the instruction. In figure 3, you can see how the supplementary discussion is distinguished from the main action of the step through the use of bold-face type.
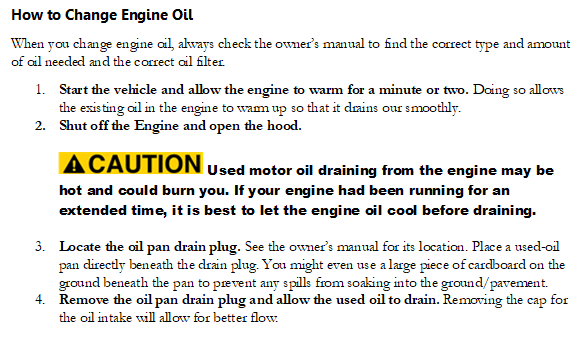
Figure 3: The main action of the steps above is bolded, while supplementary discussion is in regular font. Note also that the precautionary label really stands out in this sample.
Language and Writing Style
The questions about “Audience” and “Context” earileir in this chapter can help guide you in making effective language choices. The following subsections include explanations of common linguistic features of instruction manuals along with tips for writing clearly and concisely in this genre.
Imperative Mood
Instructions, like commands, often use the imperative mood. To write in this way, address the audience directly using active voice and specific verbs. Imperative mood typically leaves out the subject (“you”) and positions the verb first.
The way you actually write the steps, sentence by sentence, may seem contradictory to what previous writing classes have taught you. However, notice how professional instructions are written—they use the imperative (command, or direct-address) and a lot of the second person. That is entirely appropriate. You want to get your reader's full attention. For that reason, instruction-style sentences sound like these: “Press the Pause button on the front panel to stop the display temporarily" and "You should be careful not to ..."
Which of the following provides the clearest instructional step?
- Press the red button to begin playing the game
- When the red button is pressed, the game will begin
- The operator should press the button
Though a user could probably make sense of any of these sentences, the first one provides the clearest explanation of what action the user should performed because the action is the first thing mentioned. The second, passive construction does not specify who should press the button. The third example refers to a vague subject, the “operator,” which may confuse the user.
Word Choice
When writing instructions, a careful consideration of word choice is important because in some cases, the user’s safety is at risk. Always strive for clarity and concision. To make effective decisions about word choice, consider your primary audience’s level of expertise and cultural background. You may find it necessary to:
- Define complex terms.
- Spell out acronyms the first time they are introduced (e.g., digital single-lens reflex camera, DSLR).
- Avoid using similes, metaphors, slang, jargon (unless it is defined in a glossary) or substitutions that may confuse users. Keep terminology consistent.
- Use plain language. In some cases, serious legal consequences can arise when a set of instructions is unclear. For more on plain language, see the website plainlanguage.gov (https://www.plainlanguage.gov/index.cfm).
- Include translations of the instructions into multiple languages.
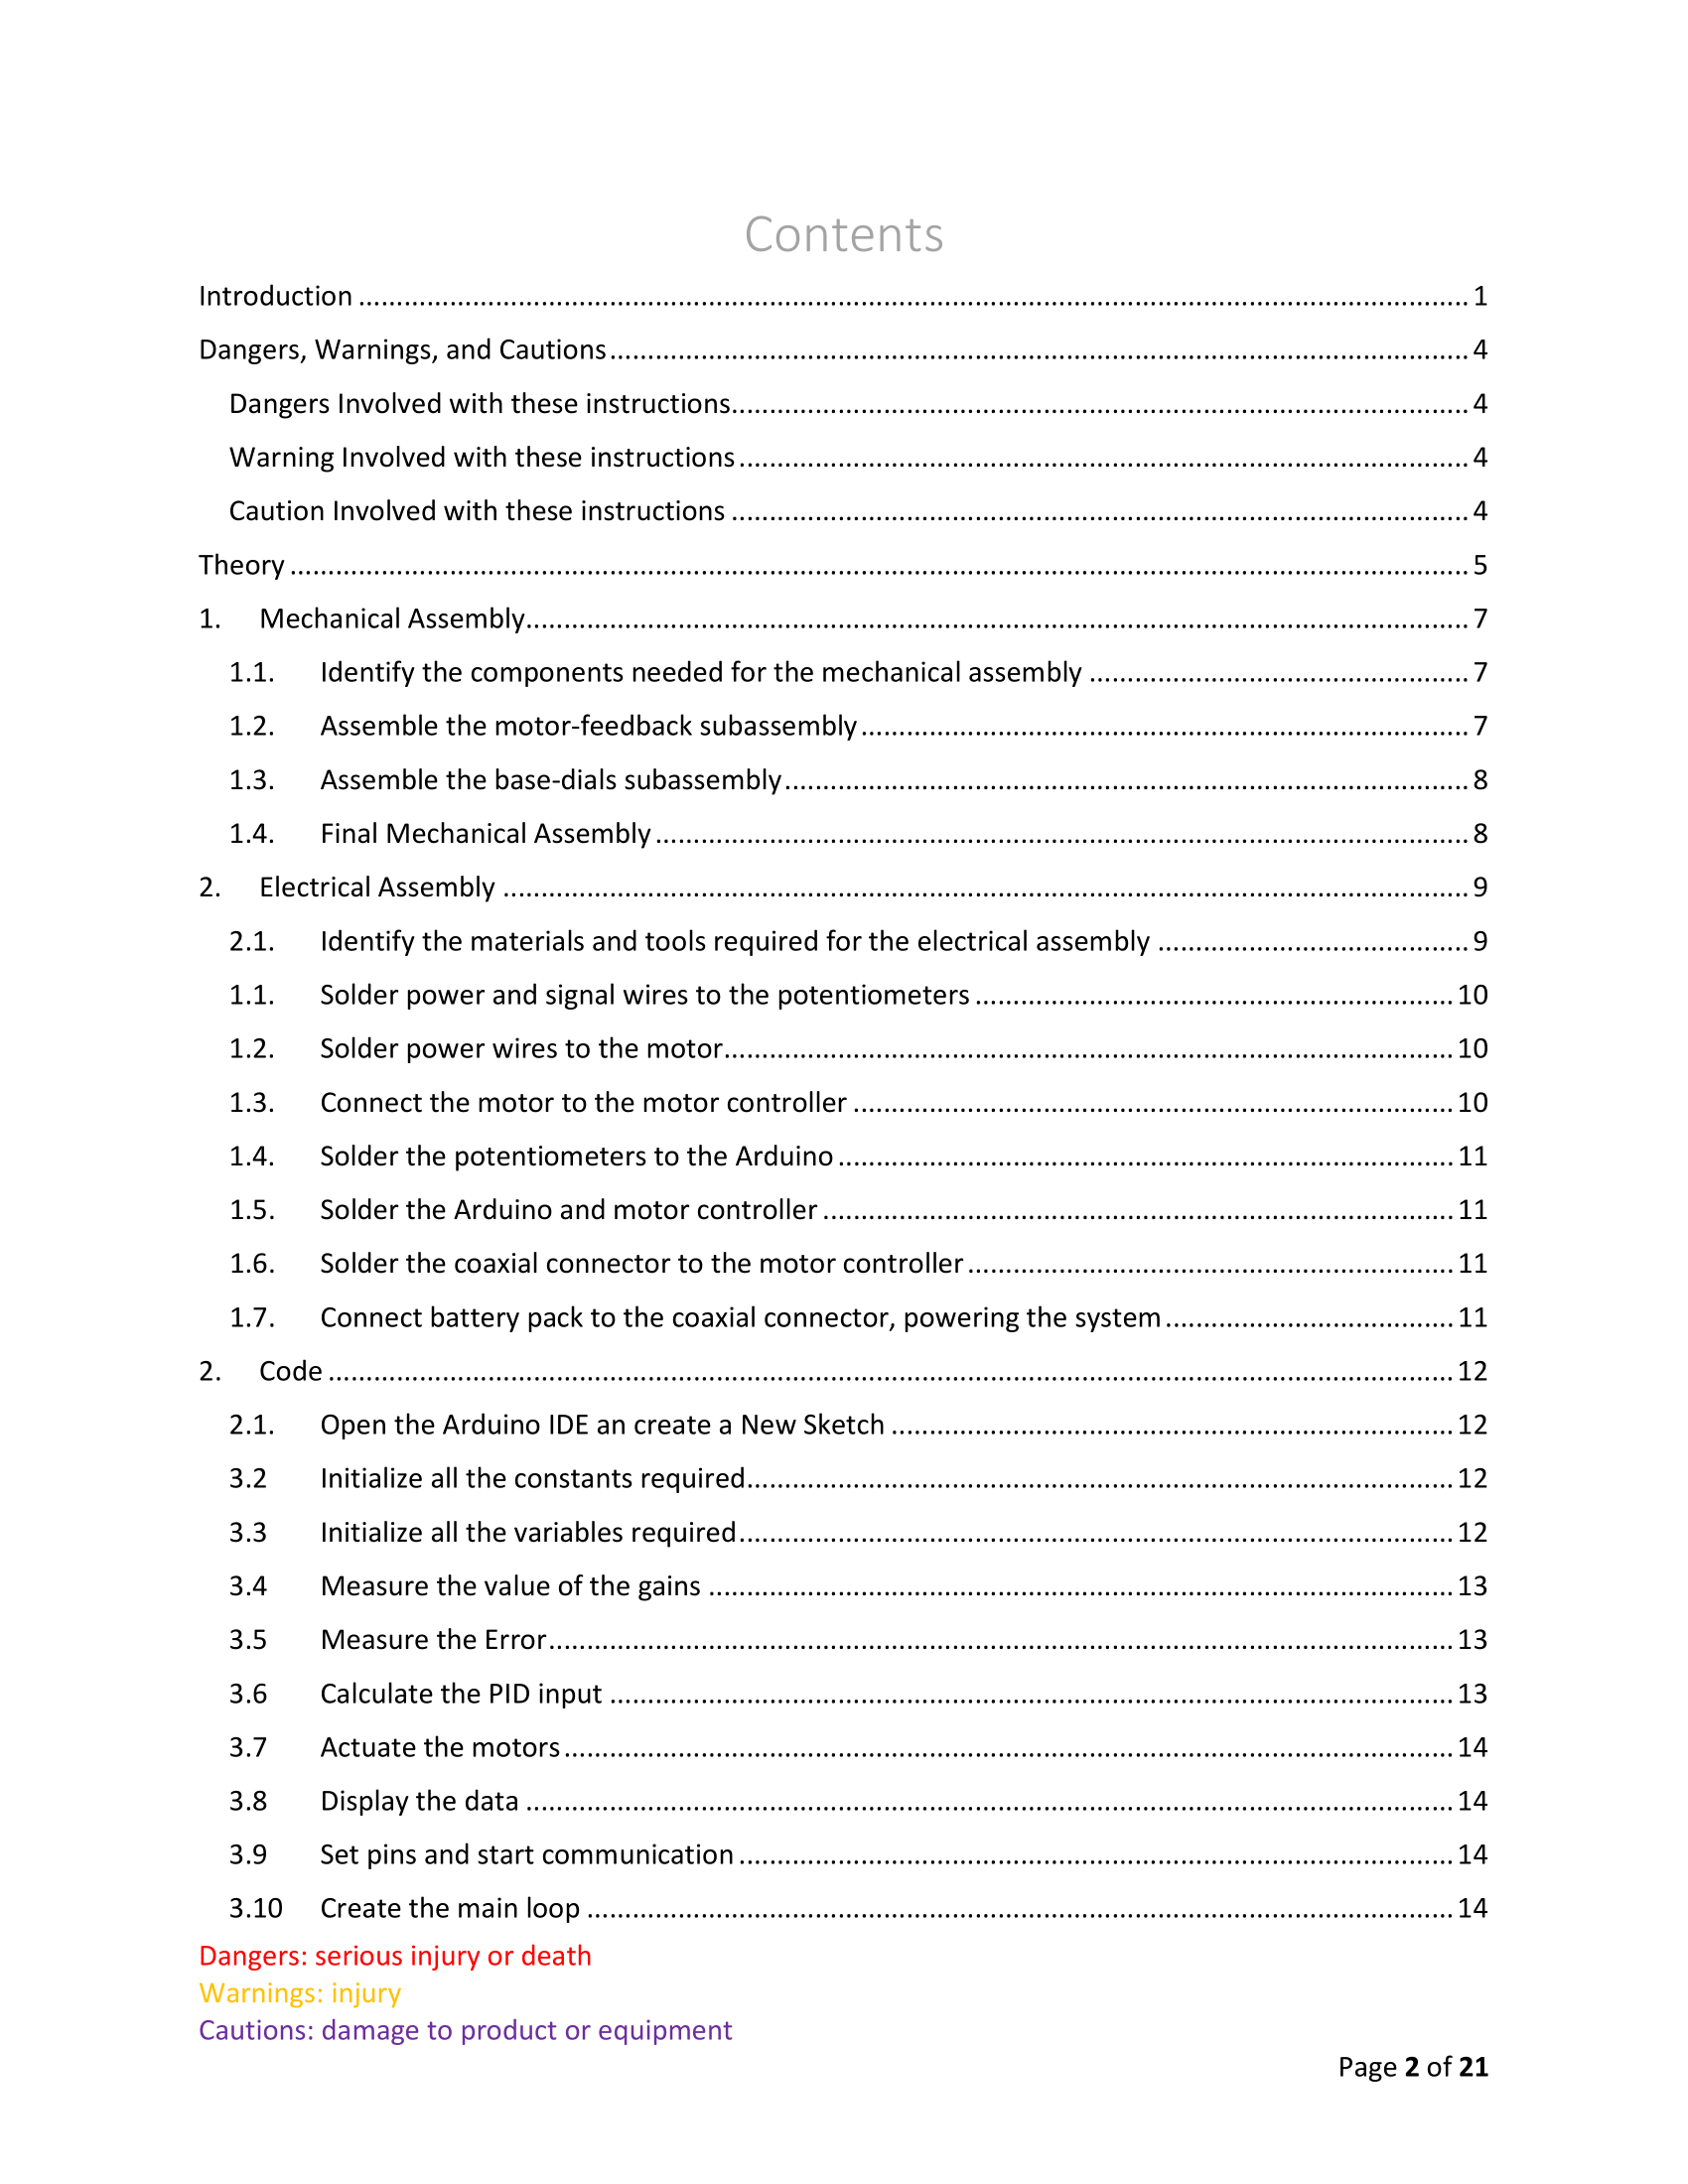
- Use brief and informative headings and subheadings.
Consistency and Parallelism
Parallel structure, or parallelism, means using the same grammatical structure to present information or ideas. Parallelism often improves readability and aids consistency.
This numerical list of instructions contains a step that breaks parallel structure. Which of these steps seems different from the others?
- Remove the screw to open the battery compartment.
- Insert batteries by following the image on the battery compartment.
- Now you may close the compartment, and screw it closed.
Step three breaks the parallel structure of the list because it does not start with a directive verb.
Do the following headings use parallel structure? Why or why not?
- Installing batteries
- Turning device off/on
- How to charge your device
Keep your word choices as accurate and consistent as possible. There is no reason to make your audience wonder if “turn,” “twist,” “screw,” and “tighten” mean the same thing. If they do mean the same thing, do not introduce the synonym simply to vary word choice. If they indicate distinct actions/movements, it may be helpful to explain that, either in a note or a glossary.
Conclusions, Closing Sections, Appendices
After all the steps are completed, you must signal the completion of the task. End the instructions with positive comments about the product and/or the process the user just completed. Congratulate the reader on a job well done. Sometimes there is a phone number for a Help Line if further assistance is needed. You might also describe the finished product or indicate other tasks the reader may now complete with the same set of skills they used to complete the procedure.
The benefits can also be restated but make sure not to use the exact words from the introduction. Readers do not like to read the same exact words/phrases/sentences in the conclusion as they did in the introduction because it feels like the writer was too lazy to actually work on the document.
Depending on the task completed in the instructions, you should include additional closing sections and/or appendices. For example, the instructions might require trouble-shooting advice, frequently asked questions, clean up and/or maintenance information, product specifications, or sources of additional information. References should be listed at the end as well.
Conclusion Examples
Conclusions for technical instruction reports are designed to provide audiences with additional facts, resources, or information that may be outside the scope of the report’s process (or topic, as indicated by the title), but are nevertheless still important to a general understanding of the subject. In many cases, technical instruction conclusions help educate the audience as to what happens after the main process has ended.
When providing instructions in the conclusion, don’t forget to rely on the verb-first sentence structure used to describe the action steps.
Conclusion Option A: Clean-Up Information
This conclusion style is appropriate for processes that create excessive waste/mess, require specific disposal instructions for hazardous substances (e.g. automotive oil; medical/chemical contaminants; nuclear materials, etc.), or require unique cleaning processes to preserve the integrity of tools, equipment, and/or the environment.
Example Topic A: How to Make Extra Crispy Chicken Wings in a BRAND X Air Fryer
Cleaning-up
- Remove the Teflon-coated racks and drip tray once your air fryer has cooled (approximately 20 minutes). Wash the trays by hand with a non-abrasive towel or sponge. Alternately, clean racks and trays in the dishwasher.
- Remove the door of the air fryer by opening to a 45-degree angle, then gently pulling upward; the hinge of the door should release easily. Wipe both sides of the door with a non-abrasive towel or sponge. Do not fully submerge the door in water, and do not place the door in the dishwasher! Doing so may cause water to collect in the door, which can degrade components and decrease longevity.
- Use a non-abrasive towel or sponge to wipe the interior of the air fryer. For a deep clean, lightly soap the towel/sponge, wipe the interior of the air fryer, rinse towel/sponge until the soap is removed, then wipe the interior of the air fryer again.
Conclusion Option B: Maintenance or Service Information
This conclusion style is appropriate for processes involving automated machinery, electronics, or other physical components that should be inspected and/or serviced on a regular basis.
Example Topic B: How to Play Three Beginner Songs on Your New Electric Guitar
Maintaining Your Guitar’s Sound and Appearance
- Guitar strings will eventually need to be replaced. A general rule is to replace strings every 3 months, or after 100 hours of playing. The material/gauge of your strings, combined with your individual playing style, will determine how quickly your strings stretch and degrade. If you notice your guitar will not stay in tune or sounds dull, these can be indicators that it is time to change your strings.
- When changing strings, use this time as an opportunity to inspect your guitar for loose knobs/screws on the headstock, pickups, pick guard, output jack, bridge, backplate and neckplate. Use a damp cloth with a mild detergent to clean the front and backside of the neck, fretboard, pick guard, and tuning pegs. Oil from your hands can build up in these areas, so regular cleaning will ensure that your guitar plays consistently while also continuing to look visually appealing.
- Store your guitar in an upright position so that the neck is not leaning at a sharp angle. Leaving you guitar at an angle for weeks or months can warp the neck, as can storing your guitar in an overly humid environment. Guitar cases—both soft and hard-shell—protect against humidity and collision damage. If storing in a hard case, do not horizontally stack cases on top of one another; always store guitars vertically.
Conclusion Option C: Frequently Asked Questions (FAQ)
This conclusion style is appropriate for providing audiences with additional information that will allow them to avoid common mistakes, or to answer common questions about the steps, materials, tools/equipment, or the processes’ practical applications. This style is often presented in a question/answer format.
Example Topic C: How to Start Pepper Seedlings Indoors Before Transferring to an Outdoor Garden
FAQ
Q: None of my pepper seeds germinated. What did I do wrong?
A: Peppers are notorious for being somewhat difficult to germinate (but not as difficult as eggplants). If after 3 weeks none of your peppers have sprouted, start the process over, but soak your pepper seeds in water for 24 hours before planting. Additionally, some gardeners find that lightly scouring both sides of the seed with sandpaper or an emery board can improve germination rates.
Q: I don’t want my peppers to be overly hot. Is there anything I can do to limit how fiery a pepper will be?
A: Much of a pepper’s heat level (or capsaicin content) is a product of genetics, so if a pepper has been bred to be spicy there is no way to remove this characteristic in a single generation. However, watering your pepper plant regularly will help moderate capsaicin production. By contrast, if you want your peppers to be as hot as possible, you should limit watering. If your desire is to produce hot peppers, wait until your pepper plants looks a little droopy—or until the edges of the leaves just start to dry—before watering. The stress on the plant encourages capsaicin production.
Q: What is the difference between a red and a green pepper?
A: Maturity. Most green peppers will change colors as they ripen, eventually, turning red, orange, yellow or even purple. (Peppers are fruits, after all!) In addition to the color change, the flavor of a pepper also develops over time. Peppers become sweeter as they age, and a red, yellow, orange, or purple color typically indicates that sugar content is increasing and chlorophyll decreasing. This means that a mature pepper will taste less “green” or “vegetal” than an immature pepper and, in general, a mature version of the same pepper (e.g. red jalapeño) will be somewhat less spicy than the immature pepper (e.g. green jalapeño) due to the additional sugars.
Conclusion Option D: Troubleshooting Advice
Similar to the FAQ, this conclusion style can provide specific advice for avoiding both common and uncommon mistakes, or for navigating around predictable obstacles that may arise during the process. Be aware that this conclusion style does not replace traditional safety labels (i.e., notice, caution, warning, danger) but should be used in conjunction with them. Troubleshooting advice may also serve to address issues, concerns, or difficulties that might arise toward the end of a process.
Example Topic D: How to Safely Drive a Standard Transmission Automobile
Troubleshooting Driver Frustrations
- If you’re experiencing difficulty mastering the clutch and keep stalling the engine, the solution may be to become more familiar with your clutch. Many cars have clutches that respond somewhat differently underfoot, requiring more or less force to depress. Learning the unique behavior of your car’s clutch will help in the mastery of this skill.
Warning: Only practice driving in safe environments, such as empty parking lots.
To gain the needed familiarity, release the emergency brake, start the car and place it in first gear. Keep the clutch depressed. Then, very slowly and without pressing the gas, release the clutch until you feel the car begin to move on its own. Keep the clutch in this mid-way position for a few seconds and make a mental note of how much you released the clutch to get here. Then fully engage the clutch to slow your momentum. Repeat this until you consistently find the spot in the clutch where the car begins to roll on its own. From this position, slowly depress the gas pedal with your right foot while simultaneously—but slowly—releasing the clutch the rest of the way.
- If after stalling you quickly try to restart the car but turning the ignition does not cause the engine to fire, one of two things may be happening:
- You may own a model car that requires the clutch to be fully depressed/engaged when starting the car;
or
- You may own a model car that requires you to place the ignition in the full OFF position (i.e. cutting all power to the car but not removing the key) before a restart is allowed.
- Driving in mud or snow can prove tricky in any automobile, but some drivers notice that standard transmission cars are more likely to “peel out” in mud or snow. If you’re experiencing difficulty getting traction in mud or snow when pulling away from a parked location, place the car in second gear. While drivers are generally instructed to begin accelerating from first gear, in some weather conditions starting from second gear may be offer potential for more control.
Conclusion Option E: Sources of Additional Information
This conclusion style provides the audience with additional resources (books, articles, websites, databases, etc.) should they want to satisfy their curiosity and learn more about the process itself.
Example Topic E: How to Pick the Right Winter Resort for Your Family Vacation
Sources of Additional Information
The following channels and websites offer in-depth analytics and reviews of ski/snowboard resorts:
This video channel offers reviews of winter resorts using 10 different criteria. Boudhens is an amateur snowboarder who provides casual, unscientific but earnest reviews of resorts with copious Go-Pro footage of Boudhens and friends performing tricks. Boudhens’s channel is unique in that he is more interested in assessing new school terrain parks and stunt features than evaluating backcountry and/or off-piste options.
The definitive online site for winter resort reviews, Powderhounds uses an eight-criteria scale to assess the overall character of each winter resort. Powderhounds provides reviews of resorts both in the United States and beyond, and is also a reliable site for determining how family-friendly a resort might be. Also offers helpful breakdowns of terrain difficulty percentages.
Because not all winter resorts receive equal snow amounts or storm frequency, ensuring that the resort you’re planning on patronizing will in fact have the conditions you are expecting is essential research. OpenSnow provides global resort snowfall totals, base depth, current conditions, as well as storm predictions. Its network of local skier/meteorologists provide reliable daily weather forecasts by incorporating multi-sourced models and imaging tools. Snow estimates are to be trusted as expected minimums, as Open Snow’s conservative predictions regularly underestimate snowfall totals.
Conclusion Option F: Product Specifications
When a process focuses on assembling new equipment or machinery, this conclusion style provides technical information such as the final weight of the assembled product, the dimensions of the assembled product, materials and components of note, energy usage data, warranty information, and any special instructions for transportation/care of the product.
Example Topic F: How to Assemble the Trash-Compactor 1000X
Product Specifications
- Finished dimensions: 10’ x 6.25’ x 8.5’ (length x width x depth)
- Finished weight: 2,389 pounds
- Maximum Capacity: 350 pounds/load
- Estimated electricity usage/load: 0.3 kWh
Conclusion Option G: Tips and Tricks
The conclusion style provides audiences with general advice that may improve their ability to perform the described process or develop a related skill. This option can also be used to combine elements of other conclusion styles (for example, providing clean-up instructions, maintenance routines, and troubleshooting advice in the same conclusion), or to address variations on the process that might allow the audience to make adjustments and changes (e.g. adding optional ingredients to a recipe; altering fermentation temperatures used by breweries and distilleries to achieve different ester profiles).
Example Topic G: How to Forage Edible Chanterelle Mushrooms
Tips and Tricks
Finding chanterelle mushrooms can be difficult enough, but cleaning them is another story. The advice below will help make the process efficient while also ensuring that the quality, taste, and integrity of your mushrooms is not compromised. Handle your mushrooms gently; they are both rare and fragile, and should be treated as such.
- Do not wash or clean mushrooms until you are ready to consume them.
- Store unwashed mushrooms in a paper bag in the refrigerator.
- Do not fully submerge chanterelle mushrooms in water when washing them. Most mushrooms absorb water readily, which can affect the way they cook and their final taste/texture.
- Use a toothbrush or medium-stiff bristled paint brush to dust away any dirt that has accumulated in the chanterelle’s false gills, on the cap, and along the stem.
- Wipe mushrooms down with a damp paper towel to remove grit.
- Wet a second toothbrush/paintbrush in a bowl of water and clean the false gills a second time.
- Wipe a second time with a damp paper towel, then place on a dry towel until ready to cook.
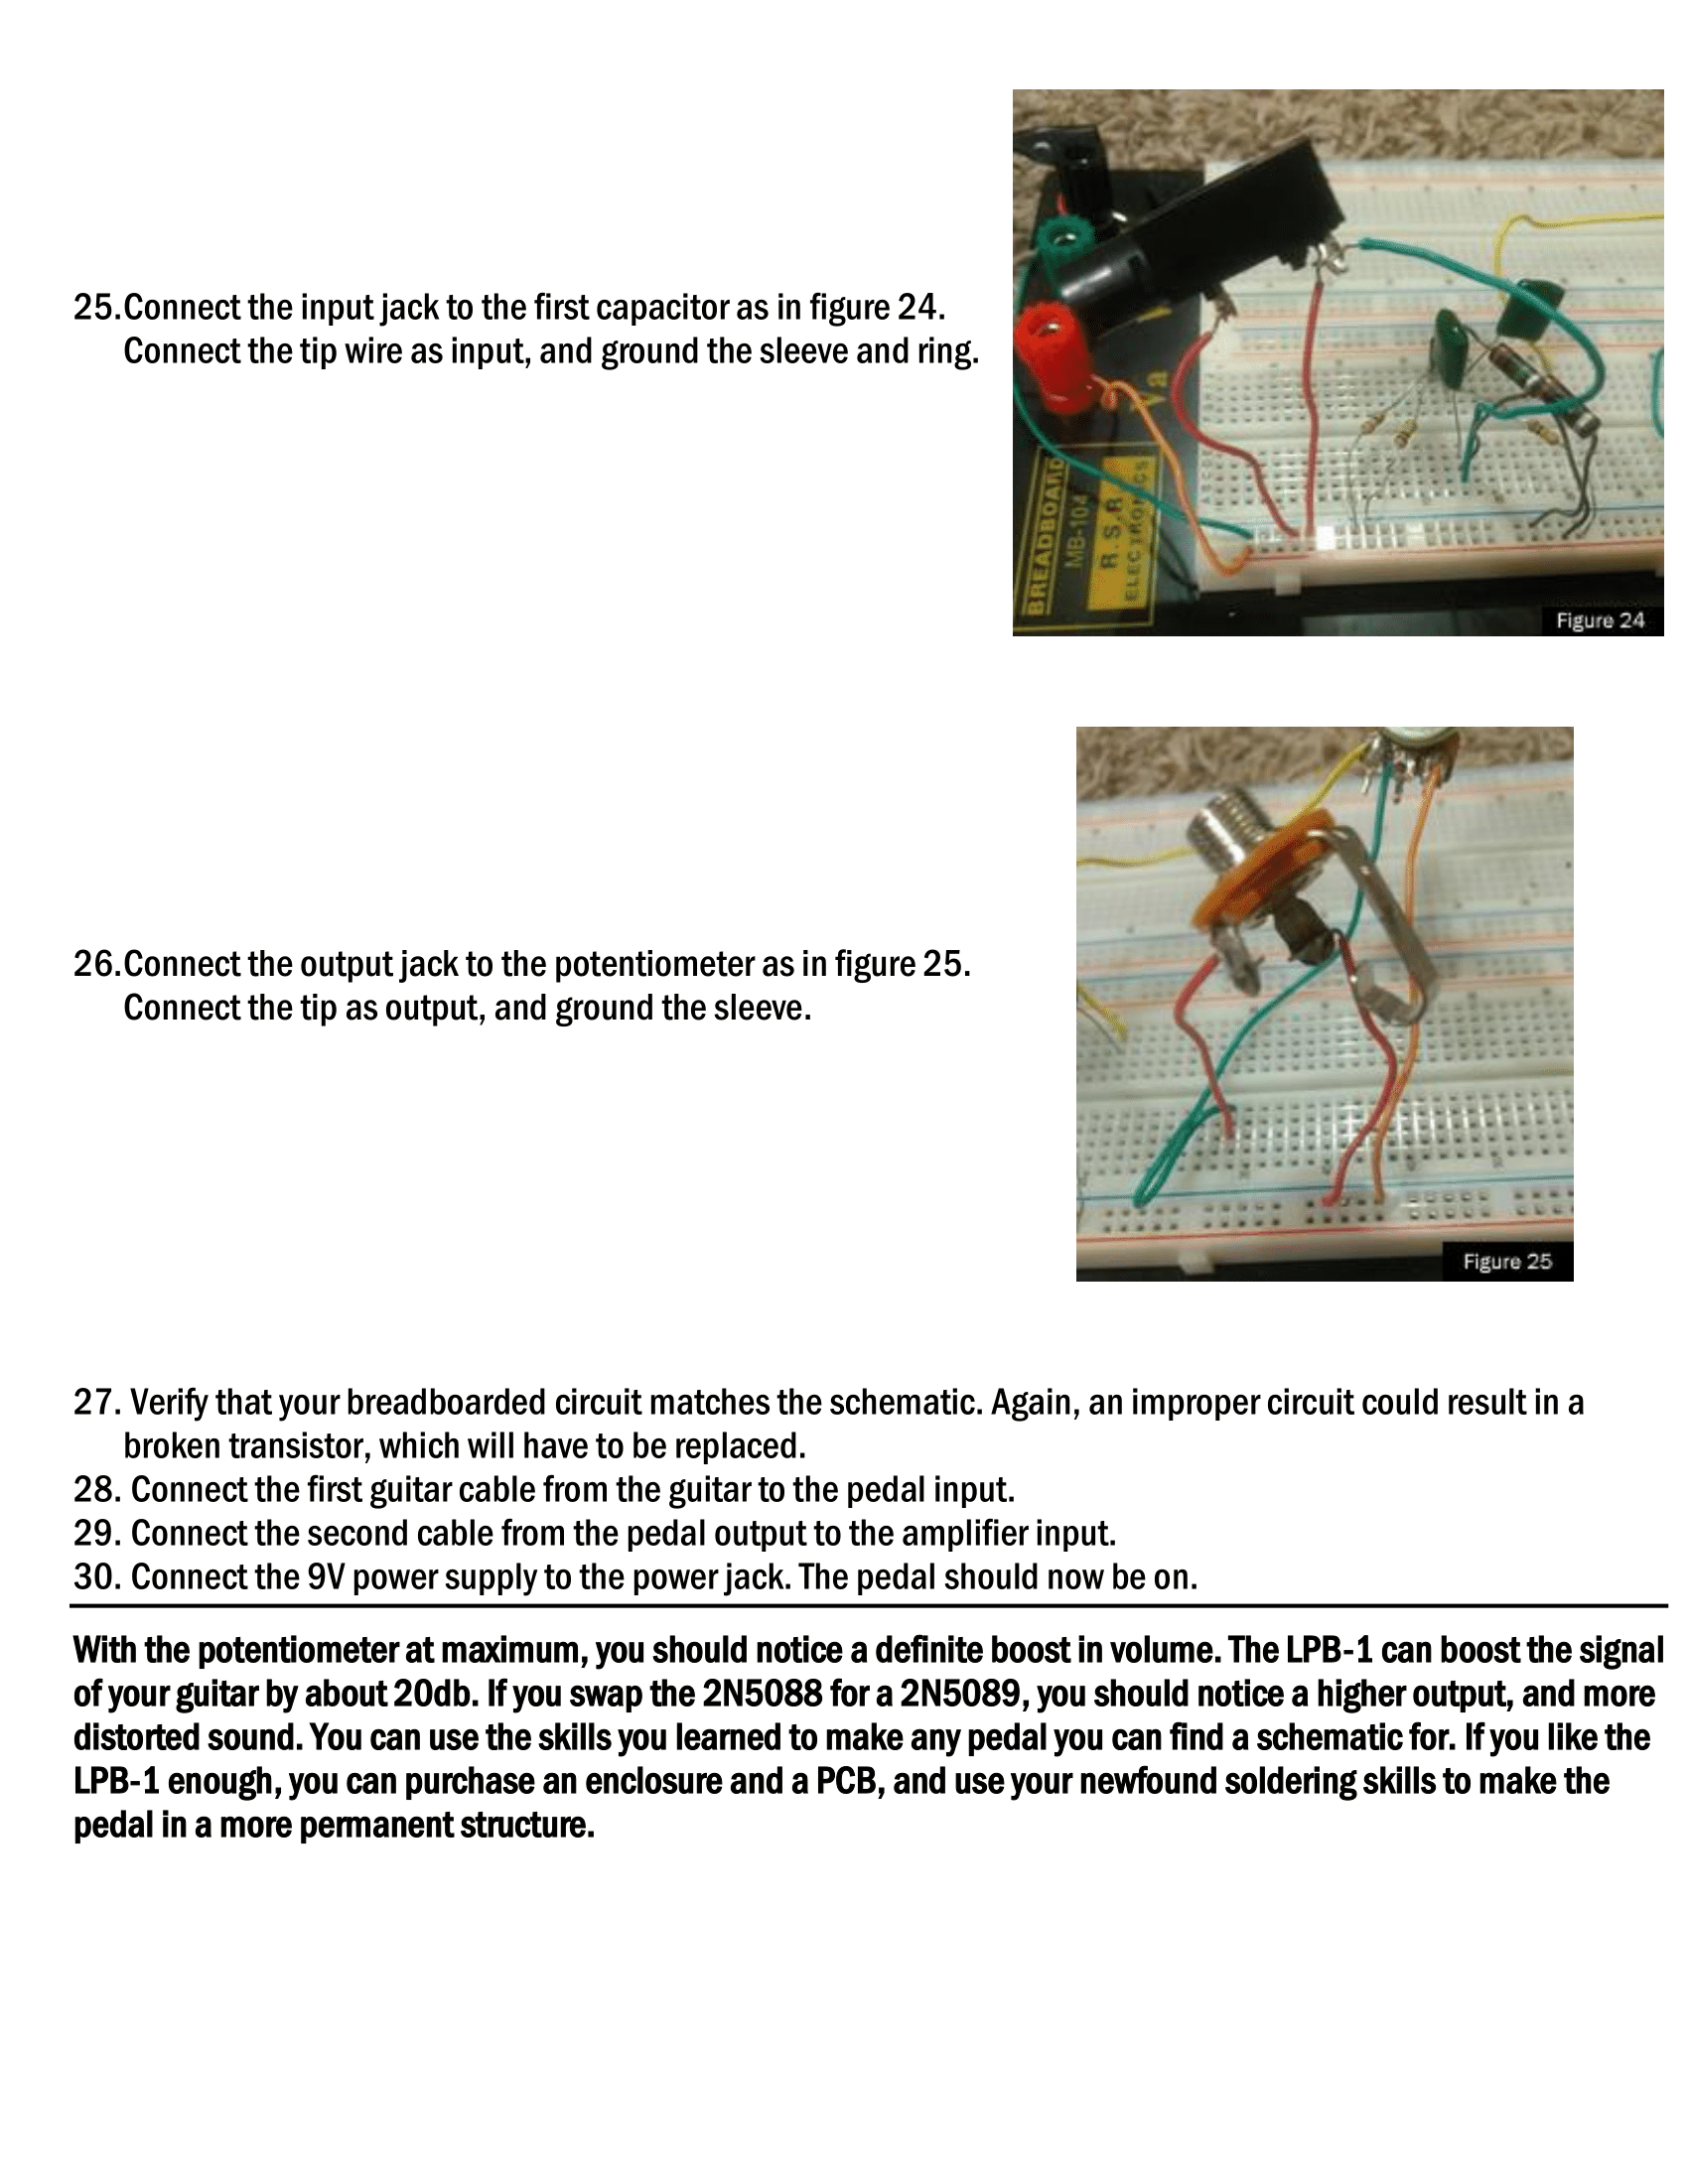
Probably more so than in any other form of writing (except maybe comic books), graphics are crucial to instructions. Sometimes, words simply cannot clearly explain the step without the assistance of images. Illustrations are critical to readers' ability to visualize what they are supposed to do. Your reader will need graphics to refer to and act as a guide through the process. Remember to label the graphics as Figure 1, Figure 2, and so on, and then title each graphic so readers know what they are looking at. Graphics can never fully replace text, and they MUST be referred to within the step-by-step part of the instructions, e.g., “Tighten the bolt located to the left of the main shutoff valve (see Fig. 5) by turning the socket wrench clockwise.”
In a technical writing course, instructions usually require you to include illustrations or other kinds of graphics—whatever would normally be used in the instructions. The problem of course may be that you do not have access to graphics that would be suitable for your particular instructions, and that you do not feel wildly confident in your artistic abilities. There are ways to overcome these problems! Take a look at these suggestions about graphics (https://www.prismnet.com/~hcexres/textbook/graphics.html). You will see not only suggestions for creating graphics, but also requirements on their format. (See chapter 5 for more information on graphics and design.)
Given the ubiquity of smart phones, and the increasing quality of the cameras they include, it should be no problem to produce high quality graphics for your instructions for a class project. If you are creating instructions as part of your job, you may need to hire a professional photographer or illustrator, and/or rely on drawings by engineers. In any case, it is crucial that you do not simply copy and paste images from internet search. (See chapters 4 and 10 for the ethical practices regarding the use of graphics.)
Document design refers to the way information is organized and presented. Because visual elements require less time to process, users will typically notice—and respond to—quality of design before quality of content. Minimally, design includes making choices about layout, order of information, font size, typeface, headings, color, and white space. Design elements should guide the user through the instructions smoothly. This means making the document scannable; a scannable document allows users to navigate through the content to locate specific information. As with any document, decisions regarding design should consider the audience, purpose, and overall ease of use. (See chapter 5 for more information on document design.)
Consistency/Repetition
Using design elements in a uniform way throughout the entire document guides users by giving them a sense of what to expect (e.g., the same typeface and size for all headings; the same layout from page to page).
Contrast
Use design elements to highlight specific information or features of the instructions (e.g., capitalizing a word for emphasis; placing a box or border around an item; changing colors for emphasis). Contrast is primarily effective when a document uses consistency overall. If there is a lack of consistency, it is more difficult to create contrast.
Alignment
Organizing items on a page with horizontal and/or vertical alignment creates hierarchy and structure, and can help achieve balance, contrast, or consistency.
Balance
Distribute items evenly across a given space. To achieve this, each item’s weight--that is, the tendency of the eye to gravitate toward an item--should be considered. For example, since an image weighs more than text, decisions about image placement should consider how to balance its weight against other items in order to prevent visual confusion.
White Space
Use white space to create a professional, balanced document. Rather than indicating the color of the space, this design element refers to an absence of images and text. White space helps distinguish between individual items and groups of items (i.e., sections of the manual) and makes scanning documents easier.
Grouping/Proximity
Place related images or content close to one another. For example, grouping together images of all the materials needed to complete the given task.
Color
Select colors to create contrast and emphasis, to guide readers across space, and to design a visually pleasing document. You should consider the document overall in order to create a consistent color scheme. For example, if you want to use blue in your document, you will want to ensure that it is used consistently and complements other document colors. This is particularly important when integrating color graphics and/or images.
Headings
In your instructions, make good use of headings. Normally, you want headings for any background section you might have, the equipment and supplies section, a general heading for the actual instructions section, and subheadings for the individual tasks or phases within that section. Take a look at the examples at the beginning of this chapter. See headings (https://www.prismnet.com/~hcexres/textbook/headings.html) for common requirements.
Lists
Similarly, instructions typically make heavy use of lists, particularly numbered vertical lists for the actual step-by-step explanations. Simple vertical lists or two-column lists are usually good for the equipment and supplies section. In-sentence lists are good whenever you give an overview of things to come. See lists (https://www.prismnet.com/~hcexres/textbook/lists.html) for common requirements.
Number, Abbreviations, and Symbols
Instructions also use plenty of numbers, abbreviations, and symbols. Follow the link for guidelines (https://www.prismnet.com/~hcexres/textbook/gram2.html#numbers) on these areas.
Precautionary Statements/Warnings
You must alert readers to possibilities in which they may damage their equipment, waste supplies, cause the procedure to fail, injure themselves or others—even seriously or fatally. Companies have been sued for missing, poorly written, and out-of-place warnings. Figure 4 provides an example of a clear precautionary statement.
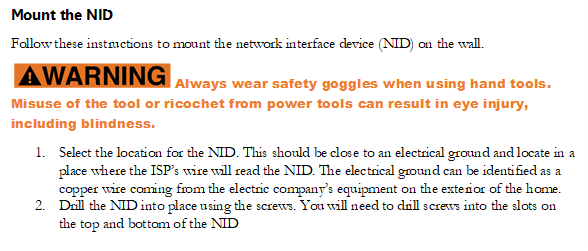
Figure 4: The precautionary statement stands out and comes before any steps are taken. The warning is placed at the beginning, before any of the steps, because missing the warning could result in material damage or bodily harm.
All procedures that require warnings must also have precautionary statements at the beginning as part of the introductory material. Warnings must also be dispersed throughout the procedure. It is especially important to include warnings before a step where damage or injury could occur. Do not create instructions where the user has already completed the process and injured themselves before the warning comes. If someone is injured as the result of misplaced, hidden, or omitted warnings, the technical writer can be held accountable. Notices, on the other hand, including user information and tips, are typically placed after a step (see figure 5 below).
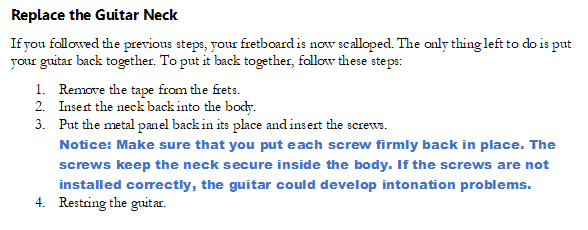
Figure 5: In this example, the notice is indented and follows the step because the information in the notice does not concern material or bodily harm.
Also, remember legal and ethical obligations. It is the writer’s job to protect the reader from harm or damage. That being said, any set of instructions needs a careful balance of warnings strategically placed throughout the document. If the writer overuses them, there is a risk of scaring the user. Alternatively, a reader may become numb to the warnings if there are too many of them, and may start ignoring the warnings.
If the writer under-uses warnings, there is a risk of someone getting injured. Strike a balance.
There are standard precautionary statements that are color-coded and used for danger, warnings, cautions, and notes or notices (see above, or you may review them here: Precautionary Statements) (https://en.wikipedia.org/wiki/Precautionary_statement) . You will be expected to incorporate information from this link into the instructions you create for the course.
As you reread and revise your instructions, watch out for problems such as the following:
- Make sure you provide real instructions—explanations of how to build, operate, or repair something.
- Write a good introduction—in it, indicate the exact procedure to be explained, indicate audience requirements, and provide an overview of contents.
- Make sure that you use the various types of lists wherever appropriate. In particular, use numbered vertical lists for sequential steps.
- Use headings to mark off all the main sections and subheadings for subsections. Remember that no heading "Introduction" is needed between the title and the first paragraph.
- Use precautionary statements as appropriate.
- Use graphics to illustrate any key actions or objects.
- Provide additional supplementary explanation of the steps as necessary.
- Remember to create a section listing equipment and supplies, if necessary.
Below are links to a number of sample sets of instructions written by students at Oklahoma State University.
Find a set of sample instructions. Look in your junk draw, under the refrigerator, or wherever those instructions end up after you have finished setting up the product. As a last resort you can look online.
The sample you find should be a set of instructions, not specifications or a procedure. The main difference between instructions and specifications is that specifications are written for experts in a particular field. Instructions are typically for novices. User manuals are a separate category that often contain instructions within them. If you find a manual for this assignment, be sure to concentrate on the instructions part.
Use the questions below to analyze the sample instructions you find. Note that professional instructions do not always use the same headings as those below. For example, they almost never use a heading of “Introduction,” but rather include introductory information under other headings.
Introductory Sections
Analyze the content of the introductory sections. Identify and explain each of the elements of the introduction (see above). Are there any left out? Why? Is there anything in the introduction that does not seem to be covered by the elements described above? What is their purpose? Are there any other features that are especially noteworthy? Who is the audience for these instructions? Include analysis of any precautionary statements here.
Body Sections
Analyze the body sections. Identify and explain how the instructions meet (or fail to meet) the requirements for the body section identified in this book. Do the instructions contain anything not mentioned in this chapter? What and why? Are there any other features that are especially noteworthy?
Conclusion Sections
Analyze the conclusion sections. How do the sample instructions measure up to what is described above? What types of information is contained in the conclusion? Is there anything not mentioned here? Any other noteworthy features?
Graphics and Design
Analyze the design and graphics. (See chapter 5.) Briefly explain how the instructions measure up to what you learned in the design chapter. How do they adhere, or how do they miss the mark? Explain. Do they use a variety of graphics? Are there enough? Too many? Anything else noteworthy about graphics or design?
[1] Johnson-Sheehan, Richard. Technical Communication Strategies for Today. Second Edition. Pearson, 2015.
[2] See Van Ittersum, Derek. “Craft and Narrative in DIY Instructions.” Technical Communication Quarterly, vol. 23, 2014, pp.227-246.
Attribution
Material in this chapter was adapted from the works listed below. The material was edited for tone, content, and localization.
Strategies for Peer Reviewing and Team Writing, by David McMurrey, licensed CC-BY.
Creating Rhetorically Effective Instruction Manuals, Writing Commons, by Madelyn Tucker Pawlowski and Antonnet Johnson, licensed CC-BY-NC-SA.
ENGL 145 Technical and Report Writing, by the Bay College Online Learning Department, licensed CC-BY.